
In this Tutorial you are going to learn, How to use Ratchet socket library to implement web socket in a Symfony application(it applies on any other PHP framework as well). Following are the highlights of this tutorial:
- Creating Socket Server in Symfony using Ratchet Socket library.
- Broadcasting and point to point messaging.
- Connecting to Socket using UI Client(Browser to Server).
- Connecting to Socket using PHP Client(Server to Server).
- Secured Production Deployment and running Socket server on Nginx using Reverse Proxy.
Okay, so let’s get started, and make a socket server.
I already have a symfony project set up, I am using Symfony 4.4 which is LTS version. I prefer to use symfony because of ease of use and customization. You can choose to use any platform you prefer.
Installing Ratchet – Web socket Library for PHP
To install Ratchet library we are going to use composer. If you’re also following this tutorial on symfony perhaps you already have composer installed on your system. From the root of your project open the command terminal and type in following command.
composer require cboden/ratchet
This will install ratchet socket library in the applications vendor directory.
Okay, the prerequisites done, let’s get to real code.
Creating Socket Server and Data Handler
The socket server will be a console command created in symfony which will run on a certain port and keep looking for incoming connection to register themselves. And Data Handler will be a class implementing MessageComponentInterface that provides the methods to overload in order to handle opening, closing connection and handling incoming/outgoing message as well as error.
Create Symfony Command
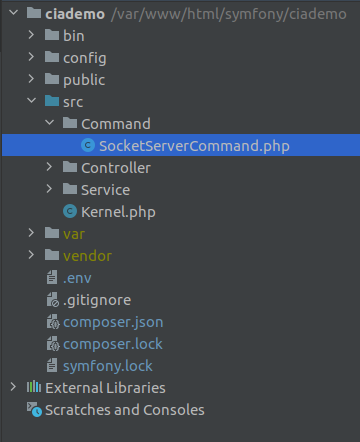
Symfony command will act as an accommodation for the socket server, to create command in symfony, create a directory under src call it Command. The filename i’ll give it is SocketServerCommand.php.
//src/Command/SocketServerCommand.php

namespace App\Command;

use Symfony\Component\Console\Command\Command;
use Symfony\Component\Console\Input\InputInterface;
use Symfony\Component\Console\Output\OutputInterface;

class SocketServerCommand extends Command
{
    protected function configure()
    {
        $this->setName('socket:run');
    }

    protected function execute(InputInterface $input, OutputInterface $output)
    {
        /*server code here*/
        return 0;
    }
}
As you can see I have created a basic command, if you go to your console and type in php bin/console you should be able to see this command in the list under socket namespace.
Next let’s make use of this command to create socket server.
Implement Socket Server
What we will do here is as follows:
- Wrap Data Handler class under
WsServerclass, which handles the web socket requests using the Data handler class. - Wrap
WsServerunderHttpServerclass which essentially act as a buffer and holds data until complete request is received and then upgrade the request to socket request. - Pass wrapped up application consisting of HttpServer, WsServer and DataHandler to
IoServerand run it on an assigned port(for this demo 8080).IoServerwill start listening on the assigned port and will take care of all input/output on the server. - Finally we will execute the run method which initiates the IoServer and server starts listening to any incoming connection.
Complete code will now look like this:
<?php
//src/Command/SocketServerCommand.php

namespace App\Command;

use App\Service\DataHandler;
use Ratchet\Http\HttpServer;
use Ratchet\Server\IoServer;
use Ratchet\WebSocket\WsServer;
use Symfony\Component\Console\Command\Command;
use Symfony\Component\Console\Input\InputInterface;
use Symfony\Component\Console\Output\OutputInterface;

class SocketServerCommand extends Command
{
    protected function configure()
    {
        $this->setName('socket:run');
    }

    protected function execute(InputInterface $input, OutputInterface $output)
    {
        $app = new HttpServer(
            new WsServer(
                new DataHandler()
            )
        );

        $server = IoServer::factory($app,8080);
        $server->run();

        return 0;
    }
}
If you run the command php bin/console socket:run it’ll throw error because DataHandler.php doesn’t exist yet. In next step create this.
Implement Data Handler Class
As shown in code example above create a class named DataHandler.php under src/Service directory. It will implement MessageComponentInterface. Initial structure should look something like this:
<?php
// src/Service/DataHandler.php

namespace App\Service;

use Ratchet\ConnectionInterface;
use Ratchet\MessageComponentInterface;

class DataHandler implements MessageComponentInterface
{

    function onOpen(ConnectionInterface $conn)
    {
        // TODO: Implement onOpen() method.
    }

    function onClose(ConnectionInterface $conn)
    {
        // TODO: Implement onClose() method.
    }

    function onError(ConnectionInterface $conn, \Exception $e)
    {
        // TODO: Implement onError() method.
    }

    function onMessage(ConnectionInterface $from, $msg)
    {
        // TODO: Implement onMessage() method.
    }
}
These methods are callbacks for the events triggered when someone takes an action on the socket. Even though function names make it obvious yet, here’s a short description on all of them:
onOpen: when a new connection is opened this method is called. You need to handle incoming connections and store them somewhere so you can use them later until connection is closed. It takes ConnectionInterface as parameter which provides the information about incoming connection.
onClose: When a connection is closed, a closing event is triggered and this method is used to handle that event, it also takes the ConnectionInterface and you need to close the connection and remove the reference from storage.
onError: If there is an error at any stage of communication and connection can’t be established, this method is triggered, ideally you log the error and close the connection and remove reference from storage.
onMessage: When a new message arrives on an active connection the event generated uses this method to handle it. You get additional parameter along with ConnectionInterface. Here you need to decide what to do with that message.You could broadcast it to all open connection or find out the target and send to individual connection, depending on the kind of app you are working on.
So let me now show you a basic operational DataHandler that will handle connections and any message coming from anywhere will be logged on server console.
<?php
// src/Service/DataHandler.php
namespace App\Service;
use Ratchet\ConnectionInterface;
use Ratchet\MessageComponentInterface;
class DataHandler implements MessageComponentInterface
{
private $connections = [];
function onOpen(ConnectionInterface $conn)
{
echo "Connected new client with Id:".$conn->resourceId."\n";
$this->connections[] = $conn;
echo count($this->connections)." active connections\n";
}
function onClose(ConnectionInterface $conn)
{
echo "Closing Connection with Id:".$conn->resourceId."\n";
foreach ($this->connections as $key => $connection) {
if ($connection->resourceId == $conn->resourceId) {
$connection->close();
array_splice($this->connections, $key, 1);
break;
}
}
echo count($this->connections)." active connections\n";
}
function onError(ConnectionInterface $conn, \Exception $e)
{
echo "Error: ".$e->getMessage()."\n";
echo "Closing Connection with Id:".$conn->resourceId."\n";
foreach ($this->connections as $key => $connection) {
if ($connection->resourceId == $conn->resourceId) {
array_splice($this->connections, $key, 1);
break;
}
}
$conn->close();
echo count($this->connections)." active connections\n";
}
function onMessage(ConnectionInterface $from, $msg)
{
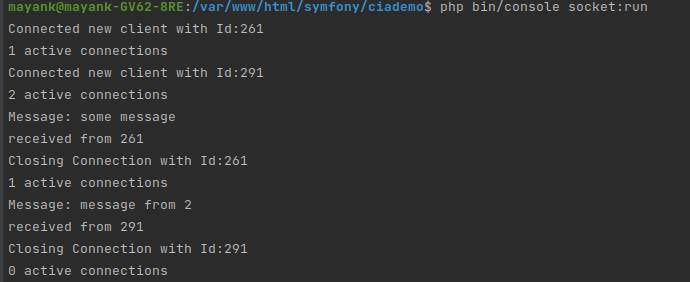
echo "Message: ".$msg."\nreceived from ".$from->resourceId."\n";
}
}
The Above code is simply storing the incoming connections in an array and when connection closes or any error occurs it removes the connection from the array and closes the connection. Ideally the error and exception occur at the time of trying to establish the connection however I like to handle close and error in similar way just in case.
I tried to see what happens if I close the browser window when connection is active, it is treated as connection closing rather than error.
By the way following screenshots show the example outcome of running the code until now in console as well as in browser. I run the server, and then create connection from browser console, send message and close the connection.

Connecting with UI Client(Web Browser to Socket Server)
In above screenshots i have shown example of how to connect from browser to server. But that is using the Developer console, In this section let me show you the JavaScript code to connect from your UI to the backend.
For this tutorial I will create a simple UI with Bootstrap and JQuery. As you know already I am using Symfony so i’ll start with installing twig first. If you’re not familiar with Twig and not using symfony you can skip directory to the code block of index.html.twig.
composer require twig
This command will install and configure the application to use twig template engine. A templates directory will be created in the project structure.
In the templates/base.html.twig i’ll do a little modification and include bootstrap CDN to make it look nicer than plain HTML. The base.html.twig now looks like this:
{# templates/base.html.twig #}
<!doctype html>
<html lang="en">
<head>
    <!-- Required meta tags -->
    <meta charset="utf-8">
    <meta name="viewport" content="width=device-width, initial-scale=1">

    <!-- Bootstrap CSS -->
    <link href="https://cdn.jsdelivr.net/npm/bootstrap@5.0.2/dist/css/bootstrap.min.css" rel="stylesheet"
          integrity="sha384-EVSTQN3/azprG1Anm3QDgpJLIm9Nao0Yz1ztcQTwFspd3yD65VohhpuuCOmLASjC" crossorigin="anonymous">
    {% block stylesheets %}
    {% endblock %}
    <title>{% block title %}Welcome!{% endblock %}</title>
</head>
<body>
<div class="container">
{% block body %}
{% endblock %}
</div>
<!-- Optional JavaScript; choose one of the two! -->

<!-- Option 1: Bootstrap Bundle with Popper -->
<script src="https://ajax.googleapis.com/ajax/libs/jquery/3.6.0/jquery.min.js"></script>
<script src="https://cdn.jsdelivr.net/npm/bootstrap@5.0.2/dist/js/bootstrap.bundle.min.js"
        integrity="sha384-MrcW6ZMFYlzcLA8Nl+NtUVF0sA7MsXsP1UyJoMp4YLEuNSfAP+JcXn/tWtIaxVXM"
        crossorigin="anonymous"></script>
<!-- Option 2: Separate Popper and Bootstrap JS -->
<!--
<script src="https://cdn.jsdelivr.net/npm/@popperjs/core@2.9.2/dist/umd/popper.min.js" integrity="sha384-IQsoLXl5PILFhosVNubq5LC7Qb9DXgDA9i+tQ8Zj3iwWAwPtgFTxbJ8NT4GN1R8p" crossorigin="anonymous"></script>
<script src="https://cdn.jsdelivr.net/npm/bootstrap@5.0.2/dist/js/bootstrap.min.js" integrity="sha384-cVKIPhGWiC2Al4u+LWgxfKTRIcfu0JTxR+EQDz/bgldoEyl4H0zUF0QKbrJ0EcQF" crossorigin="anonymous"></script>
-->
{% block javascripts %}
{% endblock %}
</body>
</html>
As you can see this is plain bootstrap starter template with twig blocks created at required places, Next I’ll create index.html.twig which will be main entry point of this demo, follow closely.
I created a directory in templates directory, so the path for index.html.twig becomes templates/app/index.html.twig.
Now just serve this file from the controller, my app controller looks like:
<?php
/*
src/Controller/AppController.php
*/
namespace App\Controller;

use Symfony\Bundle\FrameworkBundle\Controller\AbstractController;
use Symfony\Component\Routing\Annotation\Route;

class AppController extends AbstractController
{

    /**
     * @Route("/",name="index")
     * */
    public function index(){
        return $this->render('app/index.html.twig');
    }

}
The the content of index.html.twig is as follows:
{# templates/app/index.html.twig#}
{% extends 'base.html.twig' %}
{% block body %}
    <h1>Socket Demo</h1>
    <div class="row">
        <div class="col border">
            <h2>Send Message</h2>
            <div class="row">
                <div class="col">
                    <div class="sent-messages">
                    </div>
                </div>
            </div>
            <div class="message-form row">
                <div class="col-2">
                    <label class="control-label">
                        Message
                    </label>
                </div>
                <div class="col-8">
                    <input class="form-control" type="text" name="message">
                </div>
                <div class="col-2">
                    <button type="button" class="btn-send-message btn btn-primary">Send</button>
                </div>
            </div>
        </div>
        <div class="col border">
            <h2>Received Message</h2>
            <div class="row">
                <div class="col">
                    <div class="received-messages">
                    </div>
                </div>
            </div>
        </div>
    </div>
{% endblock %}
{% block javascripts %}
    <script>
        /*
        * connect to socket
        * */
        ws = new WebSocket('ws://localhost:8080');
        ws.onopen = function (){
            $('.sent-messages').append(`<div class="alert alert-success">Connected With Socket, You can send messages now!</div>`);
        }
        ws.onclose = function (){
            $('.sent-messages').append(`<div class="alert alert-danger">Connection Closed! Bye!</div>`);
        }
        ws.onerror= function (){
            $('.sent-messages').append(`<div class="alert alert-danger">Opps! Error in Connection!</div>`);
        }
        ws.onmessage = function (message){
            $('.received-messages').append(`<div class="alert alert-primary">${message.data}</div>`);
        }

        $('.btn-send-message').bind('click', function () {
            let message = $('input[name=message]');
            ws.send(message.val());
            $('.sent-messages').append(`<div class="alert alert-info">${message.val()}</div>`);
            message.val('');
        });
    </script>
{% endblock %}
Okay so this is important and let me tell you what is going on in there.
I have extended the base template and overridden the body and JavaScript blocks. In the body i created two sections for outgoing and incoming messages just to show them differently.
In the JavaScript section I have initiated the web socket using new WebSocket('wss://url') which will initiate the connection to the server.
Web Socket provides event callbacks which can be used to execute custom code whenever the event is triggered. Notice that they are similar to events method configured in DataHandler.php which takes care of these events on server side.
I used a simple input field and a send button to bind click event which takes the text from input field and send it over to the server, which returns the same message to same client and client will use ws.onmessage event to display it on second column. It would be difficult and lengthy process to show you its working with screenshot so i recorded screen cast of how it works.
Before moving on, let me show you what changes I made in the DataHandler.php.
//src/Service/DataHandler.php
function onMessage(ConnectionInterface $from, $msg)
    {
        echo "Message: ".$msg."\nreceived from ".$from->resourceId."\n";
        $from->send('Message Received On Server: '. $msg);
    }
As you can see I only added 1 line in function onMessage which is sending message back to the connection from where it was received.
Okay, so now it’s show time.
Broadcasting message to All connected Clients
You should be able to create server and connect to it with UI until now. Next step is to manage how to route the messages from socket server. In last section Server receives the message and return to the same client, where message originated.
In this step I’ll show how to broadcast to every connected client except the one where it originated.
Notice the DataHandler.php there’s an array which is storing all open connection. And we are already printing the resource Id, now change the onMessage function in such way that it loops over the connection array and send message to all except the one where resourceId matches the $from resource Id.
So the onMessage function now looks like:
//src/Service/DataHandler.php
function onMessage(ConnectionInterface $from, $msg)
    {
        foreach ($this->connections as $conn){
            if($conn->resourceId!=$from->resourceId){
                $conn->send($msg);
            }
        }
        echo "Message: ".$msg."\nreceived from ".$from->resourceId."\n";
    }
There are no changes in the UI code so you can use them as it is. However because to test multiple running instances are required I used PHP internal web server to spawn 3 instance of application.
/var/www/html/symfony/ciademo$ php -S localhost:8000 -t public/
/var/www/html/symfony/ciademo$ php -S localhost:8001 -t public/
/var/www/html/symfony/ciademo$ php -S localhost:8002 -t public/
outcome can be seen in the video:
Point to point connection (P2P Messaging like in Chat Apps)
Finally Now let’s talk about how to manage point to point connection, and how to identify where to send and receive the message from. This will require an identifier to be associated with the connection so that whenever you create a connection this identifier will be saved along with the connection and when someone sends the connection request, this identifier can be used.
The main difference between previous and this section is an identifier. In all previous example logic depended on server generated resourceId which it assigns to the clients. But in this case a user generated identifier is required so that server can identify the resource and create a virtual tunnel like experience without disturbing other clients on the server.
Let’s convert our application to a Chat UI now that we are no longer broadcasting. Please note, I’ll keep it as simple and easy as possible, purpose is to make you understand the underlying logic and not provide exact copy paste code.
Chat UI Client:
Step 1: When the connection opens client will register a unique id which will get registered with the connection on server.
Step 2: When the messages are sent from UI it’ll include a target identifier so that server will know where to send the message.
{% extends 'base.html.twig' %}
{% block body %}
    <h1>Socket Demo</h1>
    <div class="row">
        <div class="col border">
            <h2>Chat</h2>
            <hr/>
            <div class="row">
                <div class="col">
                    <div class="messages">

                    </div>
                </div>
            </div>
            <div class="row p-3 border">
                <div class="col-2">
                    <label class="control-label">
                        Message
                    </label>
                </div>
                <div class="col-8">
                    <input class="form-control" type="text" name="message">
                </div>
                <div class="col-2">
                    <button type="button" class="btn-send-message btn btn-primary">Send</button>
                </div>
            </div>
        </div>
    </div>
{% endblock %}
{% block javascripts %}
    <script>
        /*
        * connect to socket
        * */
        myUserId = '';
        messageToUserId = '';
        ws = new WebSocket('ws://localhost:8080');
        ws.onopen = function () {
            if(myUserId==''){
                myUserId = prompt('Enter User Id:');
            }
            if(messageToUserId==''){
                messageToUserId = prompt('Enter Other Person\'s User Id:');
            }
            ws.send(JSON.stringify({'action': 'register', 'value': myUserId}));
            $('.messages').append(`<div class="alert alert-info">Connected With Socket, Registering User!</div>`);
        }
        ws.onclose = function () {
            $('.messages').append(`<div class="alert alert-danger">Connection Closed! Bye!</div>`);
        }
        ws.onerror = function () {
            $('.messages').append(`<div class="alert alert-danger">Opps! Error in Connection!</div>`);
        }
        ws.onmessage = function (message) {
            data = JSON.parse(message.data);
            switch (data.action) {
                case 'error':
                    $('.messages').append(`<div id="${data.value}" class="alert alert-danger">${data.value}</div>`);
                    break;
                case 'message':
                    let msgTmpl  = `<div class="row">
                                    <div class="col-2">
                                        ${messageToUserId}
                                    </div>
                                    <div class="col-10">
                                        <div class="alert alert-primary">${data.value}</div>
                                    </div>
                                </div>`;

                    $('.messages').append(msgTmpl);
                    break;
                default:
                    break;
            }
        }

        $('.btn-send-message').bind('click', function () {
            let message = $('input[name=message]');
            ws.send(JSON.stringify({'action': 'message','to':messageToUserId,'value':message.val()}));
            let msgTmpl  = `<div class="row">
                                    <div class="col-2">
                                        ${myUserId}
                                    </div>
                                    <div class="col-10">
                                        <div class="alert alert-dark">${message.val()}</div>
                                    </div>
                                </div>`;
            $('.messages').append(msgTmpl);
            message.val('');
        });
    </script>
{% endblock %}
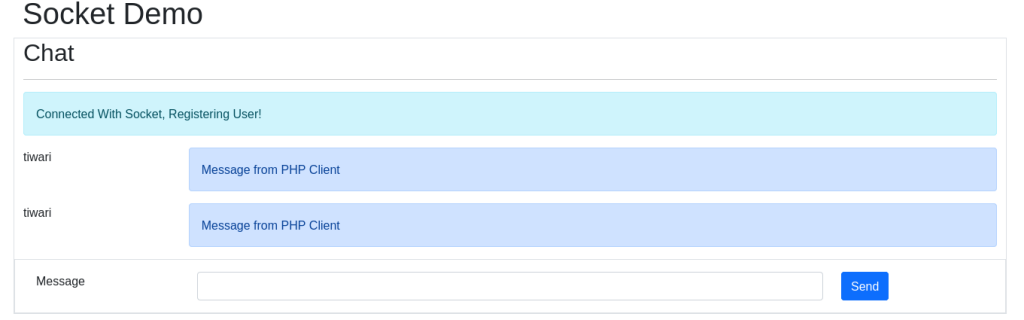
I have update the UI structure and JavaScript, how it handled messages previously. Here’s a point by point summary:
- UI updated to give a more chat like feel instead of two columns for send and receive.
- Messages will show user id in front of messages.
- JavaScript changed to take user input for User Id of sending and receiving user.
- Messages structure updated to be of JSON form so that a common structure can be used to overall messaging and for different actions.
How is it working ?
- User opens the chat window.
- There will be prompt to ask user to provide username, this username will be registered with the client id on the server to give it a unique identifier where other user can connect.
- Another prompt will open asking for username/userid of other party or other user to whom this user wants to send messages to or receive messages from. This will be stored locally for now.
- When user sends the message, it will include action, to and value.
- action = what action to take, this will tell server if user want to send message or register himself with user id.
- to = this will be used with action type ‘message’ to tell server that, user is trying to send a message to another user.
- value = this will be the actual message that is to be sent.
- Other values of Action in the sample code can be:
- register – to register the user on server.
- message – to send message or receive message.
- error – if there was an error from server side, which is not related to socket error but custom error on logic part, like ‘other party not available’.
- Other that this its normal flow of adding message to the UI whenever a message is sent or received.
Chat Server Side:
The changes are also made on DataHandler.php part so that server is not able to recognize userId(identifier) along side resourceId. Also server will decode and encode message structure in form of JSON just like on JavaScript side.
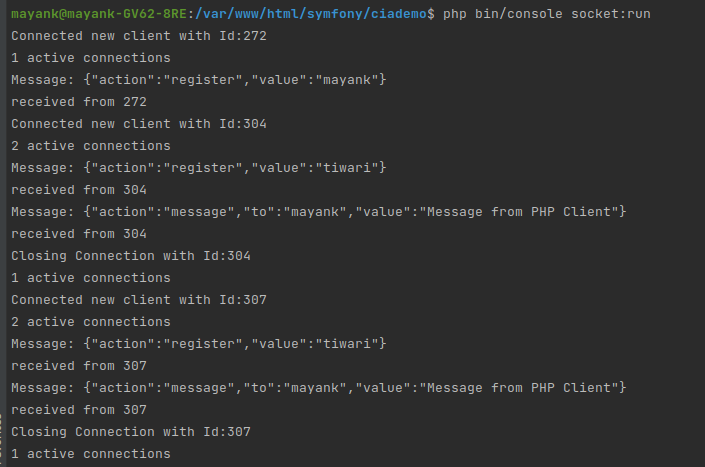
How is it working ?
- When a new register type message arrives, server will associate the userId to the resoruceId in connections array.
- When a message type request arrives, server will look for the connection having identifier matching with ‘to’ value from incoming request. If ‘to’ value matches with an identifier in connections array, server will forward message to it’s connection. If no match found, server will return message with ‘error’ as action value and UI will show that message with other messages.
<?php
/*
/src/Service/Datahandler.php
*/

namespace App\Service;


use Ratchet\ConnectionInterface;
use Ratchet\MessageComponentInterface;

class DataHandler implements MessageComponentInterface
{
    private $connections = [];

    function onOpen(ConnectionInterface $conn)
    {
        echo "Connected new client with Id:" . $conn->resourceId . "\n";
        $this->connections[] = [
            'connection' => $conn,
            'identifier' => ''
        ];
        echo count($this->connections) . " active connections\n";
    }

    function onClose(ConnectionInterface $conn)
    {
        echo "Closing Connection with Id:" . $conn->resourceId . "\n";
        foreach ($this->connections as $key => $connection) {
            if ($connection['connection']->resourceId == $conn->resourceId) {
                $connection['connection']->close();
                array_splice($this->connections, $key, 1);
            }
        }
        echo count($this->connections) . " active connections\n";
    }

    function onError(ConnectionInterface $conn, \Exception $e)
    {
        echo "Error: " . $e->getMessage().$e->getLine() . "\n";
        $conn->close();
        echo count($this->connections) . " active connections\n";
    }

    function onMessage(ConnectionInterface $from, $msg)
    {
        $data = json_decode($msg, true);
        switch ($data['action']) {
            case 'register':

                foreach ($this->connections as &$conn) {
                    if ($conn['connection']->resourceId == $from->resourceId) {
                        $conn['identifier'] = $data['value'];

                    }
                }

                break;
            case 'message':
                $found = false;
                foreach ($this->connections as $conn) {
                    if ($conn['identifier'] == $data['to']){
                        $conn['connection']->send(json_encode(['action'=>'message','value'=>$data['value']]));
                        $found = true;
                        break;
                    }
                }
                if(!$found){
                    $from->send(json_encode(['action'=>'error','value'=>'User you are trying to connect is not online!']));
                }
                break;
            default:
                break;
        }
        echo "Message: " . $msg . "\nreceived from " . $from->resourceId . "\n";
    }
}
The result of this change in code is shown in the video below:
Connecting from a PHP script(PHP to Socket Server)
Until now all the examples included connection from UI only, In this section i’ll show you how you can connect form another PHP script. One use case for this situation i had was receiving data from webhook or to send a push notification to the UI, for this whenever the data was received, this data was pushed on the socket server and from there it was relayed to all or limited number of connections.
Depending on the use case you can apply the mechanism from previous section(broadcasting or p2p messaging) in order to relay message further.
Without wasting any more time let me show you how simple it is to connect and send message from PHP to websocket.
First you’ll need to do a composer require for client library for ratchet.
composer require ratchet/pawl
After this You will need to use following code to be able to connect to socket server, I have created another action in my controller to demonstrate the functionality:
/*
imports used
use Ratchet\Client\Connector;
use Ratchet\Client\WebSocket;
use React\EventLoop\Factory;
*/
   /**
     * @Route("/php-client-demo",name="php_client_demo")
     * */
    public function phpClientDemo(){
        $loop = Factory::create();
        $reactConnector = new \React\Socket\Connector(
            $loop,
            [
                'tls' => [
                    'allow_self_signed' => true,
                    'verify_peer' => false,
                    'verify_peer_name' => false
                ]
            ]
        );
        $connector = new Connector($loop, $reactConnector);

        $connector(
            'ws://localhost:8080',
            [],
            ['Origin' => 'http://localhost']
        )->then(function (WebSocket $conn) {
            $conn->send(json_encode(['action'=>'register','value'=>'tiwari']));
            $conn->send(json_encode(['action'=>'message','to'=>'mayank','value'=>'Message from PHP Client']));
            $conn->close();
        }, function (Exception $e) use ($loop) {
            echo "Could not connect: {$e->getMessage()}\n";
            $loop->stop();
        });
        $loop->run();
        return new Response('OK - Check the Server');
    }
This code is doing exactly what we did from UI but this will not be persistent, rather it’ll open a connection, send the message and close the connection. We are not using any certificates and paths in there because everything is happening behind the proxy which is entry point of the application[describe in next step].
So overall it will behave like it is connecting the server from localhost, assuming it is running on port 8080 for this example.
Deployment on Nginx – Utilizing Reverse Proxy and SSL
So Finally you have reached at the end of this long tutorial, I hope I was able to provide a clear demonstration. I spent 2 whole days and countless web search results to figure out this last part, That was an year ago, but only last week I discovered an easier method and in this section i’ll share that only.
I use webinoly for most of my deployments[host multiple domains, deploy using webinoly]. It is a full stack for the php deployment using Nginx. This method will tell you how to create a proxy pass in nginx configuration and i’ll share my complete configuration code as well for your ease of understanding.
So basically what you need to do is create a simple proxy pass rule to forward request to localhost:8080 where socket is running and add rules to upgrade http request so it could connect as wss request. This is useful to connect via Browser, for the PHP Client if you’re running on same server you will not need this. or to say in better words this configuration let’s you connect your UI client connect to socket server in secure manner.
So in your nginx configuration of the site add :
location /socket/ {
		proxy_pass http://127.0.0.1:8080;
		proxy_http_version 1.1;
		proxy_set_header Upgrade $http_upgrade;
		proxy_set_header Connection "upgrade";
		proxy_read_timeout 3600s;
	}
And the complete code will look like:
# WebinolySSLredirectStart - HTTP to HTTPS Redirect
server {
    if ($host = domainname.com) {
        return 301 https://$host$request_uri;
    } # managed by Certbot

	listen 80;
	listen [::]:80;
	server_name domainname.com;
	return 301 https://$host$request_uri;
}
# WebinolySSLredirectEnd
# WebinolyNginxServerStart
server {
	listen 443 ssl http2;
	listen [::]:443 ssl http2;

	server_name domainname.com;

	# WebinolySSLstart
    ssl_certificate /etc/letsencrypt/live/domainname.com/fullchain.pem; # managed by Certbot
    ssl_certificate_key /etc/letsencrypt/live/domainname.com/privkey.pem; # managed by Certbot
	ssl_stapling on;
	ssl_stapling_verify on;
	ssl_trusted_certificate /etc/letsencrypt/live/domainname.com/chain.pem;
	# WebinolySSLend
	access_log off;
	error_log /var/log/nginx/domainname.com.error.log;

	root /var/www/domainname.com/htdocs;

	index index.php index.html index.htm;

	include common/auth.conf;
	include common/phpx.conf;
	include common/locations.conf;
	include common/headers-http.conf;
	include common/headers-https.conf;
	include common/headers-html.conf;
	include /var/www/domainname.com/*-nginx.conf;

	location /socket/ {
		proxy_pass http://127.0.0.1:8080;
		proxy_http_version 1.1;
		proxy_set_header Upgrade $http_upgrade;
		proxy_set_header Connection "upgrade";
		proxy_read_timeout 3600s;
	}
}
# WebinolyNginxServerEnd
Once configuration is in place, restart nginx using:
sudo service nginx restart
As you can see from the configuration the domain is already secured behind SSL, so allowing the proxy pass to localhost will let you make a secure socket call to the domain itself, your socket request will look like wss://domainname.com/socket/
Make sure the socket command is running in the background I use nohup for this purpose and command looks like
nohup php bin/console socket:run &
Finally I end my tutorial at this point in hope that I was able to cover everything required in order to work with PHP web sockets using ratchet library. For any questions and queries do comment and if in my knowledge i’ll be happy to help.
Pingback: buy androxal without a rx
Pingback: purchase enclomiphene canada medicine
Pingback: order rifaximin online
Pingback: cheapest buy xifaxan ireland over the counter
Pingback: buy cheap staxyn
Pingback: avodart online without prescription
Pingback: how to order dutasteride purchase in canada
Pingback: buying flexeril cyclobenzaprine generic brand
Pingback: order gabapentin generic canadian
Pingback: discount fildena canadian online pharmacy
Pingback: order itraconazole generic equivalent buy
Pingback: kamagra dodání následující den
Pingback: generique kamagra sens ordonnance gratuit comprime
Pingback: finasteride topical
Pingback: fluconazole 100 mg
Pingback: dutasteride for women topical
Pingback: generic for zoloft
Pingback: cenforce sildenafil 200mg tablets
Pingback: orlistat 60mg reviews
Pingback: tadalafil cialis images
Pingback: vidalista 80 mg tablet
Pingback: avanafil stendra 200 mg
Pingback: vardenafil 10mg
Pingback: flagyl 500 mg side effects
Pingback: acyclovir 400 mg generic
Pingback: saxenda pen amount
Pingback: ivermectin scabies patient outcomes
Pingback: ivermectin kinetic summary
Pingback: minoxidil onset study