In this part we are going to describe working of JPA Entity and persistence with Hibernate(hbm2ddl.auto), how to automate the process of table creation using jpa and hibernate in javaee7. This tutorial also demonstrate the configuration of the persistence unit for the datasource created on server to be used directly in the application.
Tools Used: Eclipse JavaEE – Juno, Wildfly 8.1.0
This is third part of JavaEE7 application series tutorial. In this part we are going to create the JPA entity and will use the datasource we created in the part one, if you haven’t read that tutorial you can read it here(MySql Datasource creation in Wildfly 8). Following is the complete Index of the series.
Series Index:
- MySql Datasource creation in Wildfly 8
- Project structure Eclipse+Wildfly+MySql+JPA+EJB+JSF+RS
- Creating Entity using JPA+Hibernate
- Creating EJB to do CRUD on Entity
- Creating View in JSF+Managed Bean
- Applying Bootstrap to JSF based Web Application
- Template based View in JSF Web Application
JPA entities and persistence with Hibernate(hbm2ddl.auto)
Assuming that you have your project set up complete, we are proceeding in this tutorial with the demonstration of the JPA entity creation. In this tutorial we will create an entity called Student and will use Hibernate’s auto generation property to persist the entity in the database.
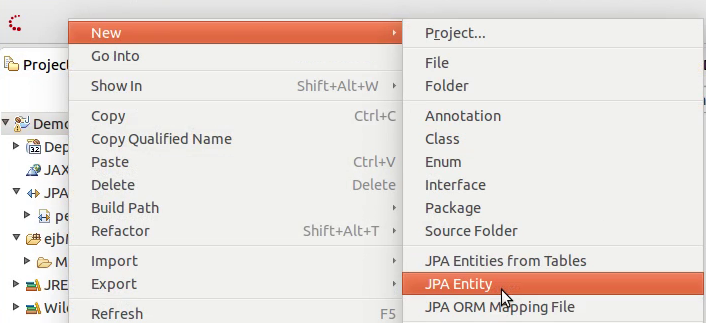
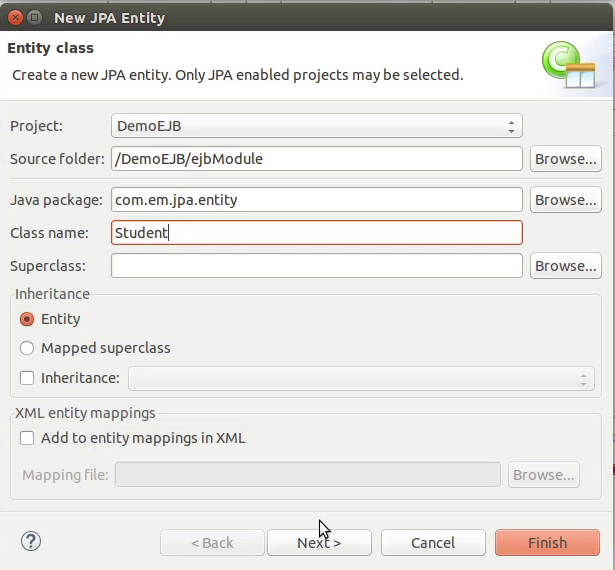
To create a new Entity right click the project module which holds your JPA module, In our case we have put our JPA structure in EJB project. So right click EJB project and New > JPA Entity. This will open a JPA entity wizard. In this you need to provide the package name and class name for the entity. Once fields are filled press Next. We are using com.em.jpa.entity and class name as Student.

In the second screen you are presented with the options to create the fields for entity, its up to you that you want to create fields here or code them later manually. We are creating four fields here.
int id
String firstName
String lastName
String Standerd
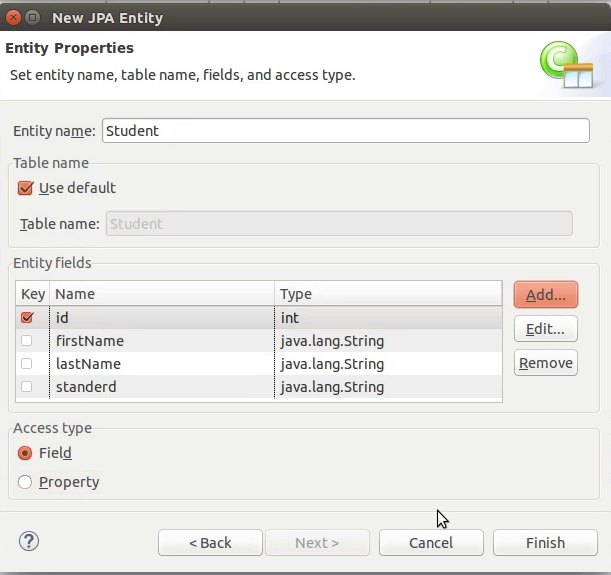
Click Add and enter the data type in first field and property name in second field, click OK. Repeat the process for the number of properties you want to create for your entity. After creating these fields we are marking “id” as key, this will annotate the id field with @Id which makes it the primary key for the table in database.
Now click Finish to complete the wizard and generate the code. Once you are through the code will be presented to you with the fields you created and pre generated getters and setters method for the fields. Also there shall be Serializable Interface implemented and auto generated serial version id. initially the fields generated looks like following code snippet.
@Id
private int id;
private String firstName;
private String lastName;
private String standerd;
private static final long serialVersionUID = 1L;
Now we need some changes in this code, first of all we need the primary key to be generated automatically whenever we create and new entry, fo this we are going to use @GeneratedValue annotation with strategy AUTO, this is the way to tell JPA that we want the id to be automatically generated, here you can leave on system to decide the way key is generated or you can specify the way you want to generate it. GenerationType is an enumeration provided with four types, AUTO, IDENTITY, SEQUENCE, TABLE. Choose as it suites you, however we are proceeding with AUTO.
Also we want to make sure that our columns are not null, so we use @NotNull annotation which is a validation constraint to ensure the not null property on the table column, also we want to limit the length of the fields so we are using @Length annotation with property max. This will make sure when the table is generated it has limited length defined for the columns. So after the basic tuning here is how our code looks like.
	@Id
	@GeneratedValue(strategy=GenerationType.AUTO)
	private int id;

	@NotNull
	@Length(max=20)
	private String firstName;

	@NotNull
	@Length(max=20)
	private String lastName;

	@NotNull
	@Length(max=5)
	private String standerd;

	private static final long serialVersionUID = 1L;
In future when we query(using JPQL) the table generated corresponding to this entity, we would like to fetch all the rows at once available, beside the custom query structure, for that purpose it is good practice to specify a NamedQuery for the entity. Named query is marked by the @NamedQuery annotation with two properties, name, which is the name of query, and query, which is the actual query to be executed. and this annotation is of entity level so placed on the entity class definition.
@Entity
@NamedQuery(name="Student.getAll",query="SELECT s FROM Student s")
public class Student implements Serializable {
...
So final code for the entity looks like this
package com.em.jpa.entity;

import java.io.Serializable;
import java.lang.String;
import javax.persistence.*;
import javax.validation.constraints.NotNull;

import org.hibernate.validator.constraints.Length;

/**
 * Entity implementation class for Entity: Student
 *
 */
@Entity
@NamedQuery(name="Student.getAll",query="SELECT s FROM Student s")
public class Student implements Serializable {

	@Id
	@GeneratedValue(strategy=GenerationType.AUTO)
	private int id;

	@NotNull
	@Length(max=20)
	private String firstName;

	@NotNull
	@Length(max=20)
	private String lastName;

	@NotNull
	@Length(max=5)
	private String standerd;

	private static final long serialVersionUID = 1L;

	public Student() {
		super();
	}
	public int getId() {
		return this.id;
	}

	public void setId(int id) {
		this.id = id;
	}

	public String getFirstName() {
		return firstName;
	}
	public void setFirstName(String firstName) {
		this.firstName = firstName;
	}
	public String getLastName() {
		return lastName;
	}
	public void setLastName(String lastName) {
		this.lastName = lastName;
	}
	public String getStanderd() {
		return standerd;
	}
	public void setStanderd(String standerd) {
		this.standerd = standerd;
	}
}
Now our entity is ready but to connect JPA to the database we need to configure persistence unit of JPA. This configuration is to be done in persistence.xml file which is available in META-INF directory of the application. We have created a datasource which we are going to use here. in the persistence.xml file, create a persistence unit using tag persistence-unit with the property name. And after that specify the JNDI name of the datasource for this persistence unit using tag, jta-data-source tag. so our code in persistence.xml looks like this.
<persistence-unit name="DemoEJB">
		<jta-data-source>java:jboss/datasources/school</jta-data-source>
...
As we mentioned earlier, that we are going to use hibernate’s auto generation property(hbm2ddl.auto) we need to specify this property with our datasource, so that system can operate on it. We use properties and property tag for the purpose. Our complete persistence.xml looks like following.
<?xml version="1.0" encoding="UTF-8"?>
<persistence version="2.1" xmlns="http://xmlns.jcp.org/xml/ns/persistence" xmlns:xsi="http://www.w3.org/2001/XMLSchema-instance" xsi:schemaLocation="http://xmlns.jcp.org/xml/ns/persistence http://xmlns.jcp.org/xml/ns/persistence/persistence_2_1.xsd">
	<persistence-unit name="DemoEJB">
		<jta-data-source>java:jboss/datasources/school</jta-data-source>
		<properties>
			<property name="hibernate.hbm2ddl.auto" value="update"/>
		</properties>
	</persistence-unit>
</persistence>
with this property we specify the value as update which tells the system to not create the entities from scratch every time the application is deployed, but to update it with any changes required.
Our persistence unit is now ready to work, when you deploy the application you will notice the creation of table named Student in the database and on checking the structure you will find that table has been created in database.
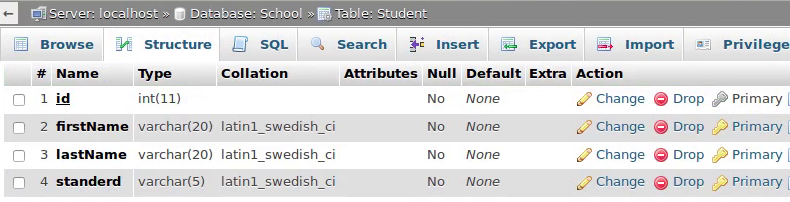
In the Image above please note the properties of the fields these are what we specified in our entities, also the name of the columns are same as the fields of the entity class.
Please feel free to comment if you find some error in the program or there is some problem in the implementation of the program. In the next part we will describe the use of EJB, we are going to divide the EJB part in two subpart, that would be using Local and Remote interface implementation.
Pingback: medicament kamagra pilule du lendemain
Pingback: online order enclomiphene buy sydney
Pingback: ordering androxal generic in united states
Pingback: cheapest buy flexeril cyclobenzaprine american pharmacy
Pingback: online order gabapentin generic pharmacy canada
Pingback: cheap fildena uk sales
Pingback: cheapest buy itraconazole cheap usa
Pingback: purchase avodart canada fast shipping
Pingback: buy cheap staxyn canada mail order
Pingback: get rifaximin purchase no prescription
Pingback: online order xifaxan cheap uk
Pingback: zdarma kamagra vzorků poštou