JavaEE EJB stateless session bean implementation using Local Interface, EJB injection in ManagedBean using Local Interface. EJB injection in JSF web application. This is one of two part EJB implementation tutorial, further it is fourth tutorial from the JavaEE application development series.
Tools Used: Eclipse JavaEE – Juno, Wildfly 8.1.0
This tutorial is next part of the JavaEE project tutorial series, in this part we are going to describe the creation and use of EJB and we will implement it with Local Interface method. Following is a complete Series Index.
Series Index:
- MySql Datasource creation in Wildfly 8
- Project structure Eclipse+Wildfly+MySql+JPA+EJB+JSF+RS
- Creating Entity using JPA+Hibernate
- Creating EJB to do CRUD on Entity
- Creating View in JSF+Managed Bean
- Applying Bootstrap to JSF based Web Application
- Template based View in JSF Web Application
In this part we are going to create stateless Session Bean. And we are going to implement two Interfaces, Local and Remote, these Interfaces are used to provide a client side implementation of the EJB. To create Stateless Session bean, you can annotate the class with @Stateless annotation and the Interfaces with @Local and @Remote as per required implementation.
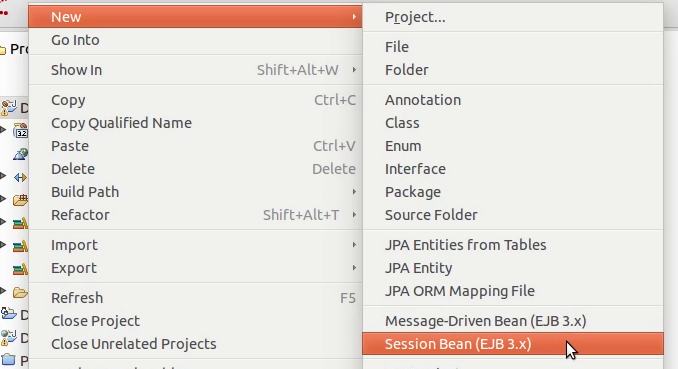
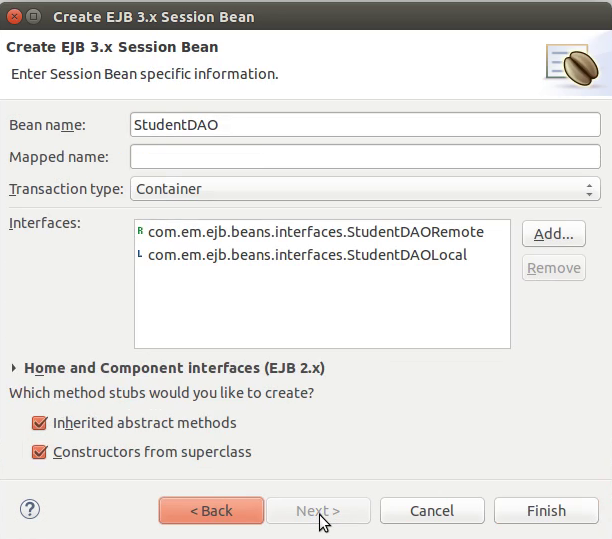
Eclipse Provide an easy way to automate the process. For this, right click the EJB Project and New > Session Bean. This opens up an wizard here, enter the Class name and package name. Then uncheck no interface view and check Local and Remote. You can specify the Name of interfaces here if required, otherwise system provide the default name for these interfaces. In our case these names were.
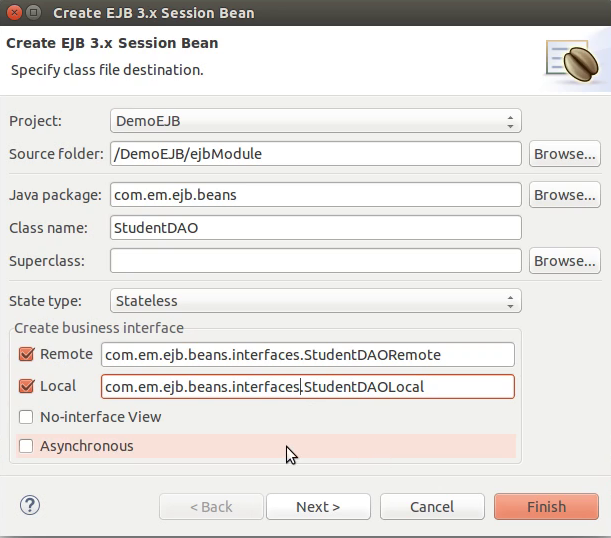
Package Name: com.em.ejb.beans
Class Name: StudentDAO
Package Name for Interfaces: com.em.ejb.beans.interfaces
Local Interface: StudentDAOLocal
Remote Interface: StudentDAORemote
Now before populating the bean class we need to populate the Interface, later on we will implement these methods in the bean class. so In the interfaces we are declaring curd methods for Student entity. The interfaces looks like this.
package com.em.ejb.beans.interfaces;

import java.util.List;
import javax.ejb.Local;
import com.em.jpa.entity.Student;

@Local
public interface StudentDAOLocal {
	public Student create(Student student);
	public Student update(Student student);
	public void remove(int id);
	public Student getStudent(int id);
	public List<Student> getAllStudents();
}
package com.em.ejb.beans.interfaces;

import java.util.List;
import javax.ejb.Remote;
import com.em.jpa.entity.Student;

@Remote
public interface StudentDAORemote {
	public Student create(Student student);
	public Student update(Student student);
	public void remove(int id);
	public Student getStudent(int id);
	public List<Student> getAllStudents();
}
Now we are ready to define the StudentDAO class, in this class we will implement both these interfaces, but in this tutorial we will use only Local Interface, Remote interface we will use in next part. the StudentDAO structure is implemented like this.
package com.em.ejb.beans;

import java.util.List;
import com.em.ejb.beans.interfaces.StudentDAOLocal;
import com.em.ejb.beans.interfaces.StudentDAORemote;
import com.em.jpa.entity.Student;
import javax.ejb.Stateless;
import javax.persistence.EntityManager;
import javax.persistence.PersistenceContext;

/**
 * Session Bean implementation class StudentDAO
 */
@Stateless
public class StudentDAO implements StudentDAORemote, StudentDAOLocal {

	@PersistenceContext
	private EntityManager em;

    /**
     * Default constructor.
     */
    public StudentDAO() {
    }

	@Override
	public Student create(Student student) {
		em.persist(student);
		return student;
	}

	@Override
	public Student update(Student student) {
		em.merge(student);
		return student;
	}

	@Override
	public void remove(int id) {
		em.remove(getStudent(id));

	}

	@Override
	public Student getStudent(int id) {
		return em.find(Student.class, id);
	}

	@Override
	public List<Student> getAllStudents() {
		return em.createNamedQuery("Student.getAll", Student.class).getResultList();
	}
}
As you can see in the code above we have used the reference of the EntityManager with annotation @PersistenceContext, this enables us to use the container managed transaction easily. We have defined the interface method to perform the CRUD operations. Please not that in the last method we have used the NamedQuery that we defined in JPA entity, this makes easy to get all entries from student database.
Now we are going to define the client side for the EJB access. We are going to use injection of EJB Local into the Managed Bean and we’ll use managed beans to use the StudentDAO methods we define. And because we are only demonstrating the access of EJB we will only create a test method to test the working on EJB. So we create a Java class and annotate it with the @ManagedBean and @ViewScoped annotation. We are using the @EJB annotation to inject StudentDAOLocal interface and obtain a reference to StudentDAO. the test bean looks like this.
package com.em.managedbeans;

import java.util.List;

import javax.ejb.EJB;
import javax.faces.bean.ManagedBean;
import javax.faces.bean.ViewScoped;
import com.em.ejb.beans.interfaces.StudentDAOLocal;
import com.em.jpa.entity.Student;

@ViewScoped
@ManagedBean
public class StudentMB {

	@EJB
	private StudentDAOLocal studentDAOLocal;

	public StudentMB() {
	}

	public void createStudent(){
		Student student = new Student();
		student.setFirstName("TutorialsJointLocal");
		student.setLastName("TutorialsLocal");
		student.setStanderd("X");
		studentDAOLocal.create(student);
	}
}
We have our test method createStudent() and we have created a Student object and filled it with sample values, and now we are going to use studentDAOLocal refrence to invoke the create method of StudentDAO and this will persist our sample Student object into the database. But to invoke the mehtod in managed bean we need a jsf page. we are not going to use our defualt index.xhtml page because we are not doing much except invoking a method.
Note:@EJB injection is a post construct injection, if you try to access it inside the constructor, it will not work, as the StudentDAOLocal will remain null at that time, so it will throw NullPointerException.
Following is the code of our index.xhtml page which is only invoking the method. This will invoke the createStudent() method which will add an entry in the database.
<!DOCTYPE html PUBLIC "-//W3C//DTD XHTML 1.0 Transitional//EN" "http://www.w3.org/TR/xhtml1/DTD/xhtml1-transitional.dtd">
<html xmlns="http://www.w3.org/1999/xhtml"
      xmlns:h="http://java.sun.com/jsf/html"
      xmlns:f="http://java.sun.com/jsf/core"
      xmlns:ui="http://java.sun.com/jsf/facelets">

<h:head></h:head>
<h:body>
Hello World!
#{studentMB.createStudent()}
</h:body>
</html>
This will not output anything on the page, but will add the entity in the database. This is it for this part. In next part of this tutorial we will come back with the detailed and step by step way of how you can operate with the Remote interface implementation. We will demonstrate the JNDI based lookup operation on RemoteInterface.
Pingback: purchase enclomiphene uk delivery
Pingback: kamagra livraison fedex
Pingback: vente androxal
Pingback: cheap flexeril cyclobenzaprine american express canada
Pingback: discount dutasteride price usa
Pingback: ordering gabapentin toronto canada
Pingback: fildena prices walmart
Pingback: buy itraconazole online without dr approval
Pingback: order staxyn at wallmart for pickup
Pingback: discount avodart generic in usa
Pingback: buying rifaximin price usa
Pingback: how to get xifaxan prescription
Pingback: obecný kamagra bez lékařského předpisu