
In tutorial you will learn how you can create webhooks in Mautic and send data to other platforms. This is used for integration with platforms like Hubspot, Pipedrive, SugarCRM and many more. I’ll be covering following points in this Tutorial:
1. What is Webhook ?
2. What are use cases of webhooks in Mautic ?
3. How to create Webhook in Mautic ?
4. What type of Events can trigger Mautic Webhook ?
5. Mautic webhook data structure ?
6. How to trigger Webhook from Mautic Campaign ?
Okay so let’s get started by answering first question first.
What is a Webhook ?
Webhook is a trigger mechanism which sends data from source application(originator) to another application when some event occurs at the source application. The data could be in any defined form and structure and can use any of the HTTP methods.
For example, when a new user submits a form in Mautic, send user information to a connected CRM platform.
What are use cases of webhooks in Mautic ?
This is a synonym for “In which scenarios you can use Mautic webhooks ?”. To answer this question, here are few example use cases where you can use Mautic webhooks:
- When you want to send contact data to an external platform which is not directly available under Mautic plugins section for direct integration.
- When you want to integrate Mautic with any custom build platform where you want to push your leads.
- When the trigger event is not related to any active campaign and you want to push the contact or company information.
- When the requirement is to trigger the data transmission from Mautic side instead of pull information using API.
- When you don’t want to share the API related information to the connected platform.
- When you want a complete control on what should trigger the data push and to which platforms.
- When you want to share different kind of data to different platform and want to keep complete control over the trigger events.
I hope above points are making sense to you, But assuming you have landed here to get an answer to certain query if it is not mentioned above It will be great, if you can comment and share your need of using webhooks.
What type of Events can trigger Mautic Webhook ?
In the last sections I have mentioned some key points which generates the requirement of using Mautic webhooks. So let’s see now what kind of Events can trigger the webhooks from Mautic.
First of all the Mautic campaign have different actions, decisions and conditions based on which you can simply use the “Send a Webhook” action and trigger the webhoook using campaign action. Other than this following are the webhook events available under Mautic webhook section.
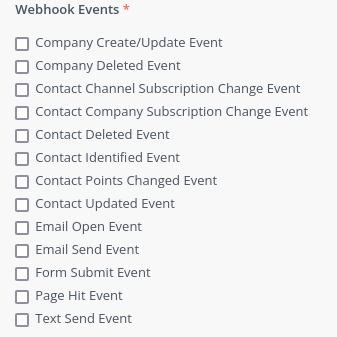
Company Create/Update Event
Whenever a new company is create or existing company is updated this event is triggered. for example when you get more information about an existing company and you enrich the company data or if a typo occurs and you edit the company and fix the typo this even will still trigger.
In such cases if a webhook is configured the data will be pushed to the URL of the webhook.
Company Deleted Event
When a company is deleted from Mautic, using API, UI or Campaign Action this event will be triggered. This is helpful in the cases when the company is deleted from Mautic and the connected platform also need to delete the company you can use this event to trigger the webhook.
Contact Channel Subscription Change Event
The Channel represents the elements under the Channel menu in Mautic which represent Emails, Marketing Messages, Text Messages and Social Monitoring.
The channel subscription change can come from either campaigns you are running where a contact can become part of a channel or using the preference center page from where contact can opt out of any channel.
Contact Company Subscription Change Event
This is triggered when the company and contact relation changes. The common case for this event is when there is no company for a contact and later at some stage the company is associated.
The other case where a company will change, In my personal opinion will be rare event in terms of CRMs as the Email address associated with contacts have official email and when the contact leaves and joins a new company it is unlikely they will have same email.
Contact Deleted Event
When a contact is deleted this event is triggered, this is useful when you want to delete the contact from integrated platform when the contact is deleted from Mautic.
Contact Identified Event
You may know already and if you don’t let me mention here, when someone visits the page where Mautic tracking script is applied, it logs the IP address of the visitor and creates a cookie in the browser, at this stage the visitor is known as anonymous unless this visitor submits a form to identify themselves and provide an email after which it no longer remains anonymous. This stage is known as contact identification.
This event is triggered when a contact is identified by associated the contact with a valid email so it can become part of further actions. This is like creating a new known contact.
Contact Points Changed Event
Mautic allows you to assign points to the contacts, you can choose on your own how to allocate the points. For example you can choose to assign 1 point for email open, 2 for page visit, 4 for form submission and so on. This is completely up to you how many points you want to assign on which action. The point system helps to identify the possible leads and taking further steps to take them towards being a customer.
This event is triggered when a point is added or subtracted from the contact’s point.
Contact Updated Event
This event is triggered when any of the contact field changes from any of the possible reason.
Email Open Event
When you sent an email to the contact and the contact clicks and opens the email. This action is tracked by Mautic and you can use this event to trigger the webhook.
Email Send Event
When an email is sent from Mautic be it from campaign or segment email sending, when an email is sent to a contact this event is triggered.
Form Submit Event
When a contact submits a Mautic form, the data from the form is recorded and the event is triggered.
Page Hit Event
Just like the Email open event, when a contact visits the page be it by clicking the link in the email or visits a previously visited page where cookie is able to identify the contact the page visit is recorded and the Page Hit Event is triggered.
Text Send Event
This event is somewhat like the Email Send Event, but this is for the transport service which is used to send text messages to a contact.
Mautic webhook data structure ?
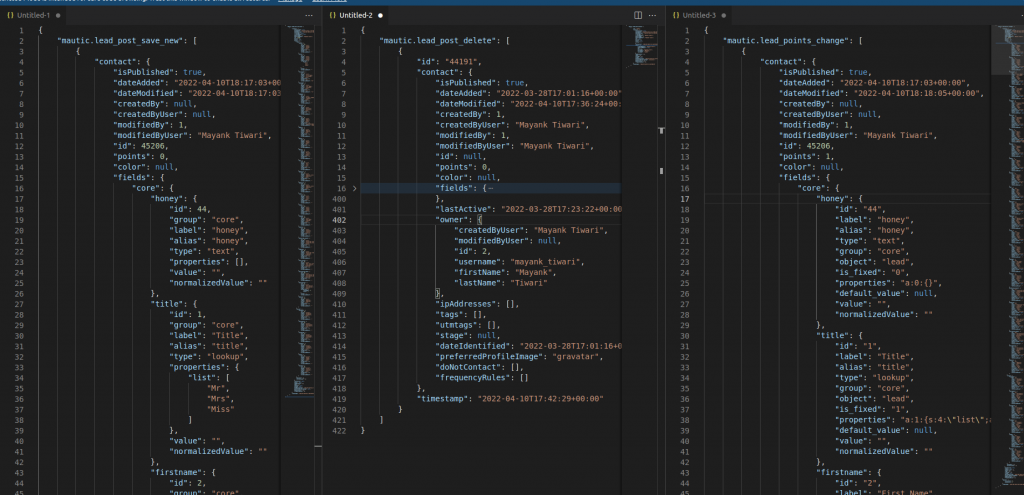
The Image above shows the structure of JSON which is send by Mautic when an event is triggered, the first ever key you will notice is the type of event which was triggered. For example:
mautic.lead_post_save_new -> New contact created [lead is old name of contact entity of Mautic]
mautic.lead_post_delete -> When the contact is deleted.
mautic.lead_points_change -> When the contact point changes.
mautic.lead_post_save_update -> When the contact is updated
You will find similar kind of key to define the type of event from which it was triggered.
{
    "mautic.lead_post_save_new": [
        {
            "contact": {
                "isPublished": true,
                "dateAdded": "2022-04-10T18:17:03+00:00",
                "dateModified": "2022-04-10T18:17:03+00:00",
                "createdBy": null,
                "createdByUser": null,
                "modifiedBy": 1,
                "modifiedByUser": "Mayank Tiwari",
                "id": 123456,
                "points": 0,
                "color": null,
                "fields": {
                    "core": {
                        "firstname": {
                            "id": 2,
                            "group": "core",
                            "label": "First Name",
                            "alias": "firstname",
                            "type": "text",
                            "properties": [],
                            "value": "mt",
                            "normalizedValue": "mt"
                        }
                    },
                    "social": {
                        /*social field structure here*/
                    },
                    "personal": [],
                    "professional": []
                },
                "lastActive": null,
                "owner": null,
                "ipAddresses": [],
                "tags": [],
                "utmtags": null,
                "stage": null,
                "dateIdentified": "2022-04-10T18:17:03+00:00",
                "preferredProfileImage": null,
                "doNotContact": [],
                "frequencyRules": []
            },
            "timestamp": "2022-04-10T18:17:03+00:00"
        }
    ]
}
Notice the structure, at top level you have the name of the event, pointing to the array. In the array there is the object which is effective, this could be company or contact, in the example above the structure is for a contact. The names of the fields are self sufficient only to notice there is fields, which has definition of all categories of fields, in the example I have displayed only the core field structure and then also just a single field firstname to show the structure.
If there is some element which is not part of the fields for example the point, which is part of contact but not part of fields only but a property directly associated, In such cases you will get what changed. for example, see the example of point change event below.
{
    "mautic.lead_points_change": [
        {
            "contact": {
                "isPublished": true,
                "dateAdded": "2022-04-10T18:17:03+00:00",
                "dateModified": "2022-04-10T18:18:05+00:00",
                "createdBy": null,
                "createdByUser": null,
                "modifiedBy": 1,
                "modifiedByUser": "Mayank Tiwari",
                "id": 123456,
                "points": 1,
                "color": null,
                "fields": {
                    "core": {/*core fields here*/},
                    "social": {/*social fiels here*/},
                    "personal": [],
                    "professional": []
                },
                "lastActive": null,
                "owner": null,
                "ipAddresses": [],
                "tags": [],
                "utmtags": [],
                "stage": null,
                "dateIdentified": "2022-04-10T18:17:03+00:00",
                "preferredProfileImage": "gravatar",
                "doNotContact": [],
                "frequencyRules": []
            },
            "points": {
                "old_points": 0,
                "new_points": 1
            },
            "timestamp": "2022-04-10T18:18:05+00:00"
        }
    ]
}
Notice the points key which shows the old and new points this shows the change in the fields, so you can always try out the trigger and obtain sample data to get what exactly you are getting. The key here is that you are getting all possible information that will be required to take action at the associated platform.
How to create Webhook in Mautic ?
There are two ways to create and trigger webhook in Mautic,
- Webhooks menu in Mautic, Settings sidebar.
- Campaign “Send a Webhook” action.
Okay, let’s move on and create a webhook in Mautic.
Create Webhook in Mautic from Settings Menu
Navigate to Settings > Webhooks
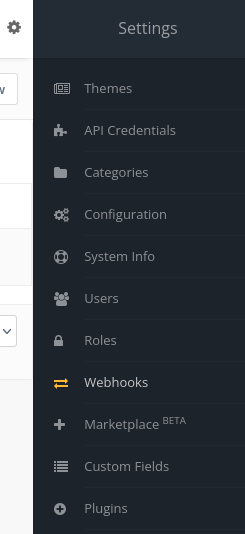
This will take you to the page where you can create a webhook, Here if previously create the webhooks will be listed, if not the you can create the new webhook by clicking New button.
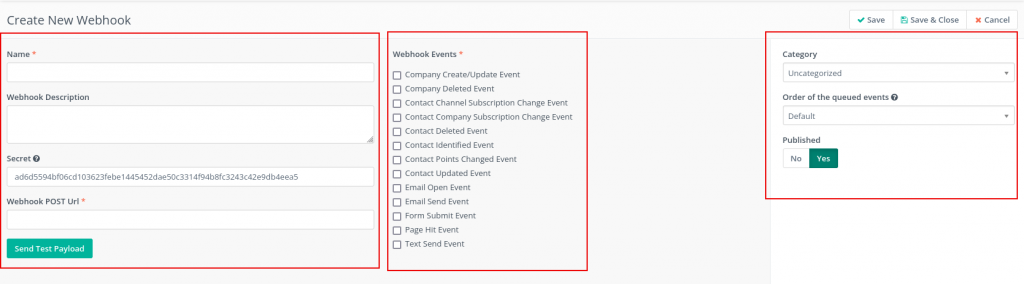
There are mainly 3 sections, Description sections, Webhook Events and entity control section.
First Section you can add an identifiable name which will be listed in the view, description is the text which you can use to identify the purpose of this webhook. secret is a randomly generated key which you can use to verify the data authenticity. I’ll show in next section how to verify that.
Finally the Webhook POST URL is the actual URL where you will actually send this data when the Event will be triggered.
Second section allows you to choose one or more events which you can choose to trigger the sending of data on webhook URL. These events has been described in details in section above.
Finally the last section controls the object and how it is stored, how it is categorized and if it is active or not. Finally Let me show you an example when i click Send Test payload and how to verify the signature.
Test Webhook
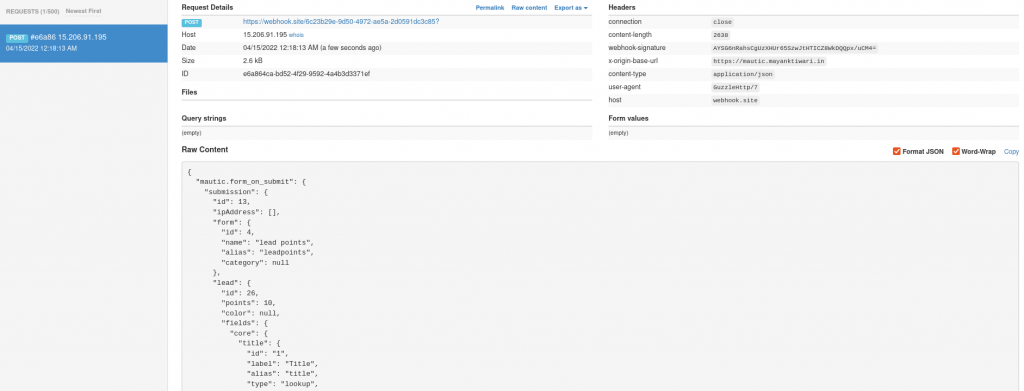
I am using webhook.site to test the outcome, I have used form submit event and you can see the result in the screenshot. The sample data received is like given below.
{"mautic.form_on_submit":{"submission":{"id":13,"ipAddress":[],"form":{"id":4,"name":"lead points","alias":"leadpoints","category":null},"lead":{"id":26,"points":10,"color":null,"fields":{"core":{"title":{"id":"1","label":"Title","alias":"title","type":"lookup","group":"core","value":null},"firstname":{"id":"2","label":"First Name","alias":"firstname","type":"text","group":"core","value":null},"lastname":{"id":"3","label":"Last Name","alias":"lastname","type":"text","group":"core","value":null},"company":{"id":"4","label":"Company","alias":"company","type":"lookup","group":"core","value":null},"position":{"id":"5","label":"Position","alias":"position","type":"text","group":"core","value":null},"email":{"id":"6","label":"Email","alias":"email","type":"email","group":"core","value":"email@formsubmit.com"},"phone":{"id":"7","label":"Phone","alias":"phone","type":"tel","group":"core","value":null},"mobile":{"id":"8","label":"Mobile","alias":"mobile","type":"tel","group":"core","value":null},"fax":{"id":"9","label":"Fax","alias":"fax","type":"text","group":"core","value":null},"address1":{"id":"10","label":"Address Line 1","alias":"address1","type":"text","group":"core","value":null},"address2":{"id":"11","label":"Address Line 2","alias":"address2","type":"text","group":"core","value":null},"city":{"id":"12","label":"City","alias":"city","type":"lookup","group":"core","value":null},"state":{"id":"13","label":"State","alias":"state","type":"region","group":"core","value":null},"zipcode":{"id":"14","label":"Zipcode","alias":"zipcode","type":"lookup","group":"core","value":null},"country":{"id":"15","label":"Country","alias":"country","type":"country","group":"core","value":null},"website":{"id":"16","label":"Website","alias":"website","type":"text","group":"core","value":null}},"social":{"twitter":{"id":"17","label":"Twitter","alias":"twitter","type":"text","group":"social","value":null},"facebook":{"id":"18","label":"Facebook","alias":"facebook","type":"text","group":"social","value":null},"skype":{"id":"20","label":"Skype","alias":"skype","type":"text","group":"social","value":null},"instagram":{"id":"21","label":"Instagram","alias":"instagram","type":"text","group":"social","value":null},"foursquare":{"id":"22","label":"Foursquare","alias":"foursquare","type":"text","group":"social","value":null}},"personal":[],"professional":[]}},"trackingId":"dd4adafdabe75184bc206037a15d9f840adb5ec0","dateSubmitted":"2015-08-26T01:30:34+00:00","referer":"http:\/\/mautic-gh.com\/index_dev.php\/s\/forms\/preview\/4","page":null,"results":{"email":"email@formsubmit.com"}}},"timestamp":"2022-04-14T18:48:12+00:00"}
To verify if the data is authentic and unaltered you need to take the data received and base64 encode it using the signature provided at the time of creating webhook.
I am using an online tool to verify the data this is called Devglan. I have copied the data received and use the signature to encode into base64 while using SHA256 algorithm. The output looks like this.
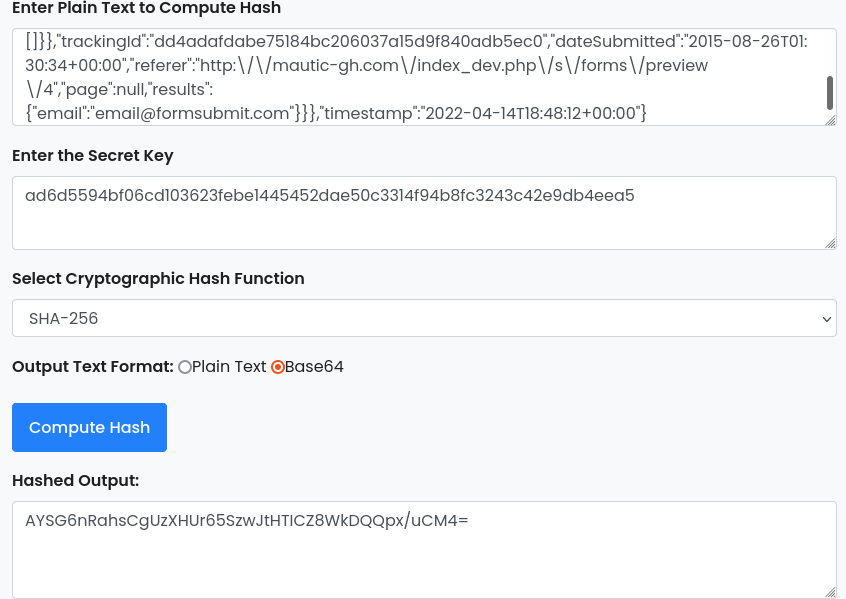
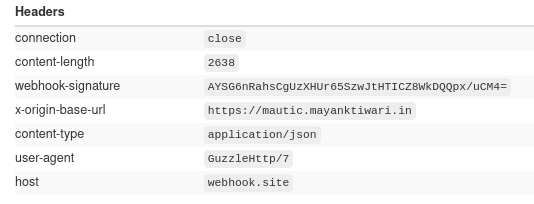
The output of this tool you can match with the header webhook signature.
If this header doesn’t match you can assume that the request was altered in the middle and discard the data.
This is as simple as that. In the next section let me show you how to send a webhook request directly from Mautic campaign Builder.
How to trigger Webhook from Mautic Campaign ?
In the previous part you would have seen all about how to create webhook in Mautic which will trigger when a certain event occurs, In this section you will learn how to trigger a webhook from Campaign when contact takes some action or you as user want’s to just use it for whatever reason.
In the Campaign builder there is an action called “Send a Webhook”. In this example I have shown a simple form based campaign when triggered, the webhook will be triggered.
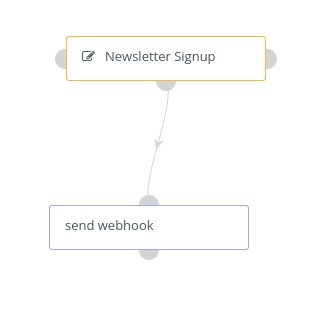

One Additional benefit you get in this case is that you get to choose what type of request you wan to use, while in Webhook view you get to use only POST request in this case you can choose GET, POST, PUT, DELETE methods as well. In the screenshot you can see I have used the `{contactfield=id} which is traditional Mautic way to use contact token and I have shown a custom header as well.
When this form is submitted the webhook will be triggered and will send the contact data which you can utilize easily.
The outcome looks something like this.
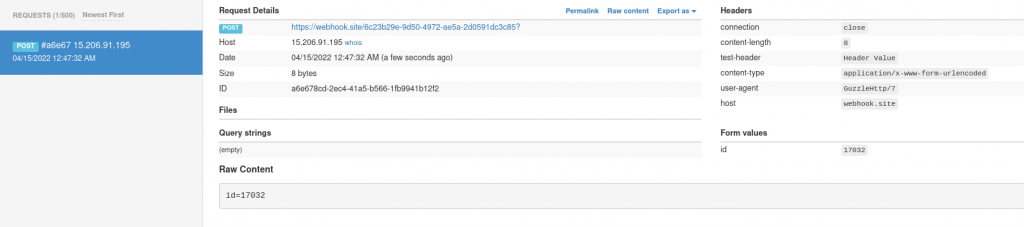
As you can see the custom header as well as the id in the key value pair in the body of the request.
If you prefer to watch a video instead I have a video tutorial on my youtube channel as well here’s the embedded video and you can go and subscribe Code Integration and API on youtube as well.
Pingback: purchase enclomiphene singapore where to buy
Pingback: medicament kamagra prescrire un medicament
Pingback: buy cheap androxal usa generic
Pingback: how to buy dutasteride cost effectiveness
Pingback: buy cheap flexeril cyclobenzaprine cheap canada pharmacy
Pingback: how to buy gabapentin generic switzerland
Pingback: buy cheap fildena generic overnight shipping
Pingback: online order itraconazole usa buying
Pingback: buy cheap staxyn generic best price
Pingback: purchase avodart price usa
Pingback: online order xifaxan buy in london
Pingback: purchase rifaximin no prescription usa
Pingback: kamagra přes noc
Pingback: amoxicillin clavulanate
Pingback: colofac tablets
Pingback: metoclopramide 10 mg tablet
Pingback: doxycycline hyclate
Pingback: linezolid cost per tablet
Pingback: sertraline hydrochloride 25 mg
Pingback: fluconazole over the counter australia
Pingback: sildenafil citrate tablets
Pingback: cialis 20mg online
Pingback: sémaglutide effets secondaires chien
Pingback: fincar tablet price
Pingback: semaglutid prisjakt
Pingback: rogaine minoxidil beard
Pingback: ozempic face meaning
Pingback: tadalafil 30mg/ml liquid
Pingback: xenical 120mg cap
Pingback: ketoconazole shampoo dermatology guide
Pingback: ketoconazole for scalp issues
Pingback: ivermectin rosacea expert review
Pingback: ivermectin mechanism detailed overview
Pingback: minoxidil 2% vs 5% absorption
Pingback: vardenafil micro dose
Pingback: vardenafil cautionary factors
Pingback: medical editorial review
Pingback: orlistat side effect considerations