In this tutorial I am going to explain how you can use Mautic API in order to connect Mautic with any other platform as per requirements. Mautic uses REST API and I assume you already know the basics of REST API as I am not going into details of REST APIs, if you don’t know about it, Here’s a compact overview of REST API by RedHat. My focus in this article will remain mainly on Mautic APIs.
All the details about Mautic REST API and its available endpoints as well as supported authentication is available in official developer documentation. However in this tutorial I’ll show you how to access the API by doing all 3 types of Authentications available.
How to Enable Mautic API ?
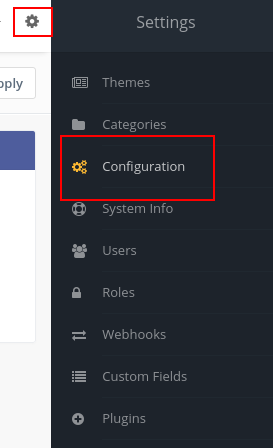
The Mautic API is not enabled by default in a fresh instance. If you wish to use Mautic API then you need to first enable it from Configuration section. Following are the steps:
- Go to
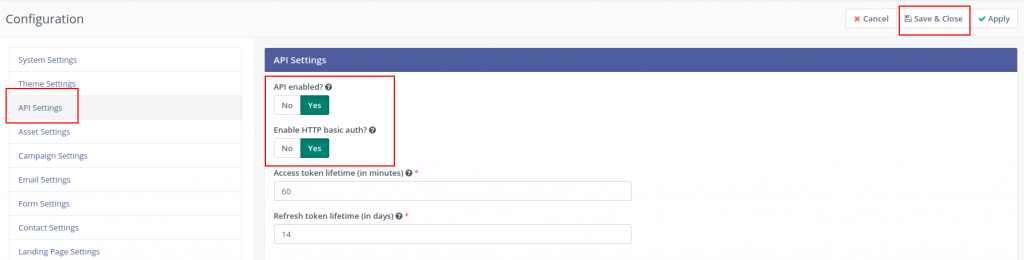
Settings > Configuration > API Settings. - Set
API enabled?to YES. - If you wish to use
HTTP basic authset it to YES as well. For the purpose of this tutorial I will be demonstrating basic auth as well, thus I’ll enable it as well. - Save and Close.
- Clear the Mautic Cache to ensure the API is enabled and accessible.
Once API is enabled you should be able to access it using the domain of your Mautic by appending /api on it. for example if your domain is https://mautic.example.com you can access API at https://mautic.example.com/api.
Anything that comes after the /api is known as ‘endpoint’, that says which object you will be accessing, for example ‘contact’ end point is available at https://mautic.example.com/api/contacts. That I’ll show ahead in this tutorial.
If you test the API at this stage by calling endpoint in your browser or postman, you shall see a JSON response saying access denied, that is because you need to have authentication before you can actually access any endpoint. In the next section I’ll show how to authenticate.
{"errors":[{"message":"API authorization denied.","code":401,"type":"access_denied"}]}
Mautic API authentication
In this section I’ll demonstrate what kind of Authentications are available and how to obtain valid authentication in order to access API and call the endpoints.
What type of authentication is available ?
Mautic supports 3 kind of authentication methods, OAuth1a, OAuth2 and Basic HTTP. OAuth2 is most secured way to access API out of all 3. However in this tutorial I’ll show all 3 of them. This article by Synopsys summarizes the key differences between OAuth 1 and 2 in easy words.
So Let’s start with our demonstrations now.
HTTP Basic Authentication in Mautic
This is the easiest of all, once you enable it from the Settings > Configurations > API Settings it becomes super easy to access the API. Basic HTTP method requires only username and password in order to access API. So for example if your username and password is myusername and mypassword then the step goes as follows:
- Combine username and password by colon(:) for example
myusername:mypassword. - Then
base64 encodeit, here’s free tool for base64 encoding strings. However assuming your will be doing it with some programming application there will be various methods for the same. the outcome will look something likebXl1c2VybmFtZTpteXBhc3N3b3Jk. - The encoded string generated from step 2 can be used as Authorization header when making requests. the header will look like
Authorization: Basic bXl1c2VybmFtZTpteXBhc3N3b3Jk.
The video shows how to use HTTP Basic Auth in Mautic using Postman.
OAuth1 Authentication in Mautic
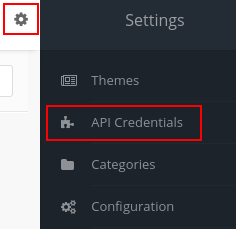
For Oauth1 you need to obtain the API credentials from Mautic. When in first step you enabled the API for Mautic, a new menu was added in the settings sidebar. This new Menu is called, ‘API Credentials’.
- Create New Credentials.
- Select
OAuth 1.0afrom the first dropdown. - Fill in Name.
- Add a callback URI, in this example I have used example URL only.
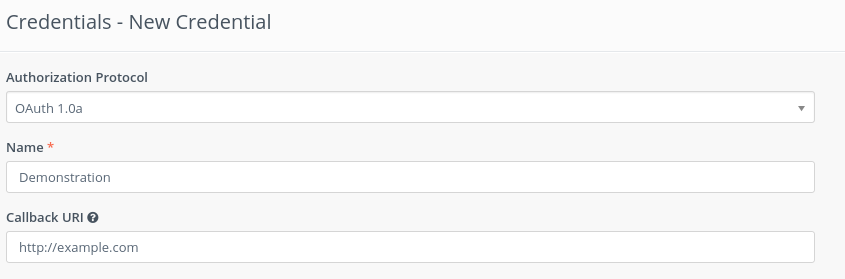
- Save and Close.
- You should See Public Key and Secret Key, Copy these keys and Keep safe.

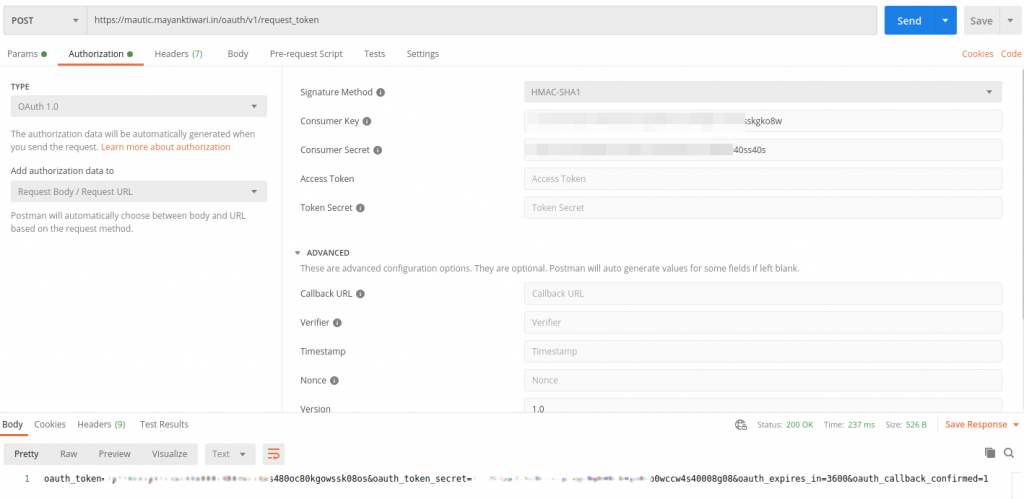
- In the Postman, Create a new POST request.
- Enter the URL of the Mautic instance[don’t use /api here], you need to obtain request token first, the complete URL will look like
https://mautic.example.com/oauth/v1/request_token. - In the Authorization Tab, choose OAuth 1.0 under the TYPE drop down.
- In the fields on right, Enter
Consumer KeyandConsumer Secret. [Public Key = Consumer Key, Secret Key = Consumer Secret] - Make request, and it should return a response with Query string in which
oauth_token,oauth_token_secretandoauth_expires_inis returned.
- In Next step, Postman will not work because a browser is required. Take the
oauth_tokengenerated in previous step and create a request in browser likehttps://mautic.example.com/oauth/v1/authorize?oauth_token=xxxxxxxxxoauth_token_obtained_in_previous_stepxxxxxxxxx&oauth_callback=url_encoded_callback_as_provided_while_creating_api_keys. - Then browser will redirect to Mautic for authorization and will ask you to log in if not already logged in, and authorize the application.
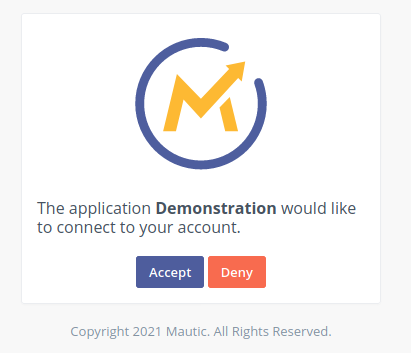
- Accept and authorize the request, it’ll redirect back to the example.com domain with some parameters in the URL, it’ll look like http://example.com/?oauth_token=xxxxxxxxxxxxx480oc80kgowssk08os&oauth_verifier=xxxxxxxxxxxxwwc40wsscgck4g4k4gs4wogc0
- The oauth_token obtained from the first request and oauth_token returned by the redirect URL should be same, if not reject the process and start again.
- If oauth_token is same then proceed to next step with oauth_verifier value.
- With oauth_token and oauth_verifier next step needs to make request to obtain Access Token.
- To get access token make a POST request to URL
https://mautic.example.com/oauth/v1/access_token
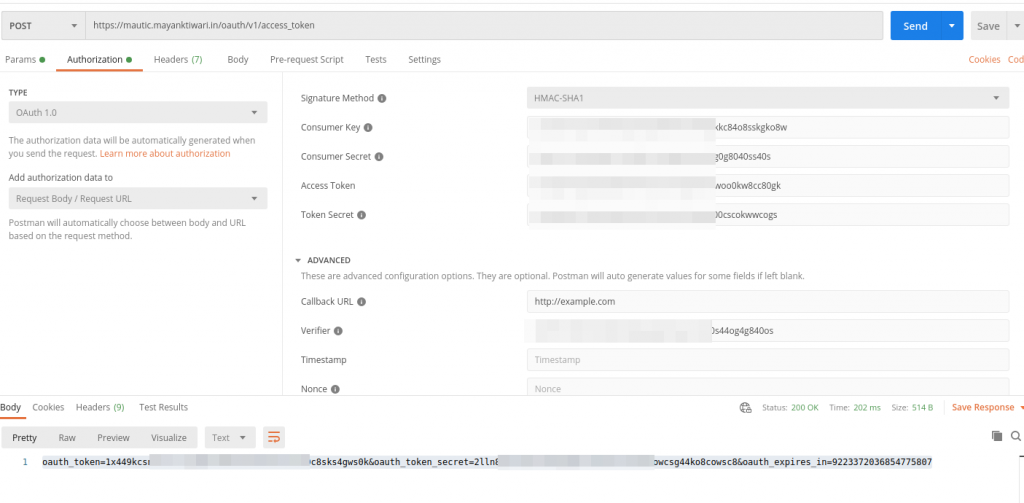
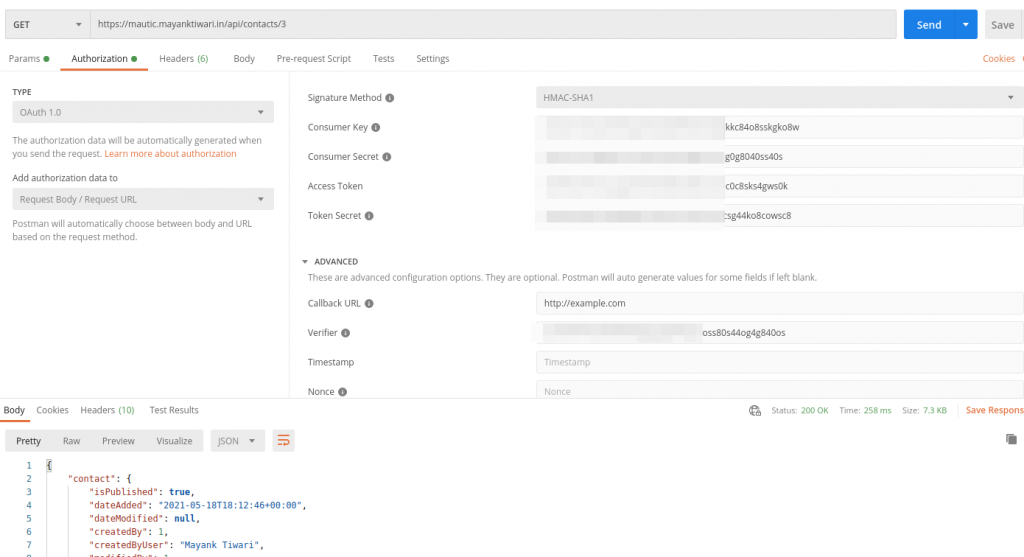
- In the screenshot,
Access tokenused is theoauth_tokenreceived from redirect URL,Verifierisoauth_verifierreceived in redirect URL andToken Secretis theoauth_token_secretreceived as response in request token request(first request).
- When the request succeeds you will receive a response string like
oauth_token=1x449kcsnxxxxxxxokow84o4ckxxxxxxsks4gws0k&oauth_token_secret=2lln83yxe6xxxxxxxxcsg44ko8cowsc8&oauth_expires_in=9223372036854775807 - These parameters can be used to make the API request, where the
Access Tokenwill beoauth_tokenandToken Secretwill beoauth_token_secret. - You don’t need Verifier in this request.
OAuth2 Authentication in Mautic
Initial steps for OAuth2 remains same, you need to go to API Credentials section and generate credentials, further steps are also somewhat similar but little difference. Please note that OAuth2 requires HTTPS and a redirect URL, for this tutorial I will be using https://example.com only.
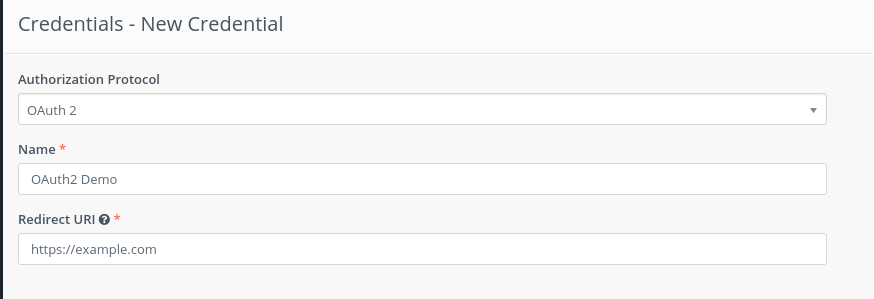
- Fill in the details in the form.
- Save and Close.
- You will get
Public KeyandSecret Key. - Copy these and keep safe.

- To Authorize we need to redirect to the
oauth/v2/authorizeendpoint of the Mautic, and append some parameters in the URL for this the URL will look like this:https://mautic.example.com/oauth/v2/authorize?client_id=xxxxxxpublic_key_generated_in_first_stepxxxxxx&grant_type=authorization_code&redirect_uri=https%3A%2F%2Fexample.com&response_type=code - Please make sure the callback URI is URL encoded.
- Make URL and put in browser and enter.
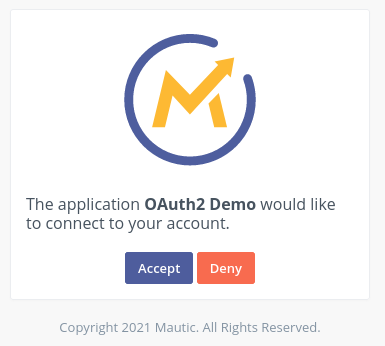
- It’ll redirect you to Mautic Instance for Login.
- After login it’ll ask permission to grant access to the application, i.e.
OAuth2 Demo.
- On successful authentication it’ll redirect you back to the redirect URI, which in this case is https://example.com. The URL with code looks like this:
https://example.com/?state=&code=NWM3Nzg5MTIzxxxxxxNzRhYzVhNmRmxxxxxxYTRiZjQyNxxxxxxTBhYzViMzZlMA - Ideally a Unique state is passed and also the Scope, but, in Mautic it is not required to pass scope parameter in authorization, however state you can pass in order to ensure safety of request from CSRF attacks. In this demo i have skipped this step.
- Next step is to make a POST Request using the code returned from the previous request.
- Please keep in mind the code returned by the previous request is short lived and should be used immediately to make next request. Example is given below.
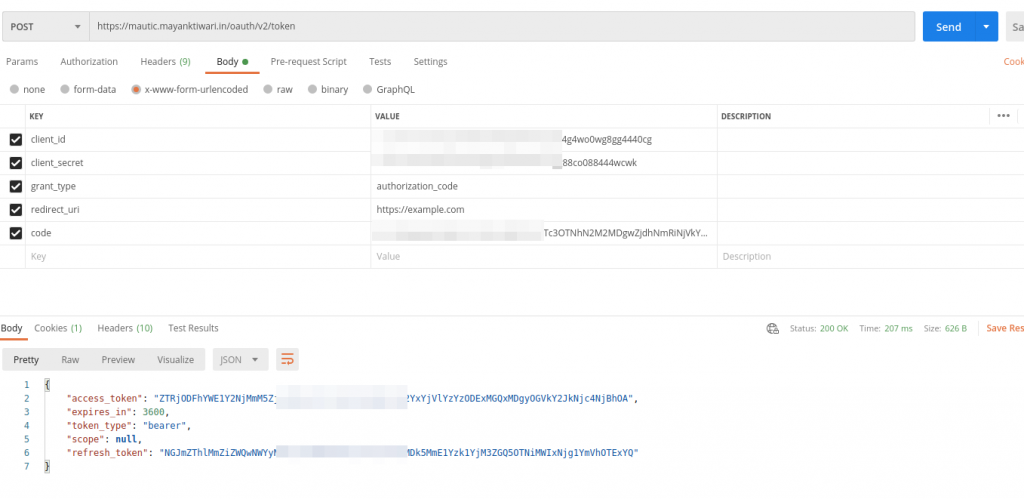
- As you can see in the screenshot above, the request made will return the access token and refresh token.
- In the Request above following are the parameters:
- No Headers used, just plain post request, with
form-urlencodedbody. client_idispublic keyclient_secretissecret key- redirect_uri is obviously the redirect URL configured at the time of generating credentials. In this example,
https://example.com codeis the code received in the previous request on successful authorization of application grant.
- No Headers used, just plain post request, with
- The request, generates the Access Token and Refresh Token which can be used to make API Calls to Mautic.
{
    "access_token": "ZTRjODFhYWE1Y2NjMmM5ZjYyxxxxxxzODExMGQxMDgyOxxxxxNjc4NjBhOA",
    "expires_in": 3600,
    "token_type": "bearer",
    "scope": null,
    "refresh_token": "NGJmZThlMmZiZWQwNWYyNDVjxxxxxx3ZGQ5OTNiMWIxNjxxxxxxTExYQ"
}
- The
access_tokenis valid only for the number of seconds provided inexpires_in. - When the
access_tokenexpires you can userefresh_tokento generate a freshaccess_token. - To generate fresh
access tokena similar request is made tooauth/v2/tokenendpoint. An example screenshot is added below.

- As you can see in the screenshot, everything is same as previous request except for the grant type, which is
refresh_tokenand instead of code only refresh_token is used. - The response is a JSON data with new
access_token.
{
    "access_token": "M2ZkZmQ1YzMxxxxxxxxMwYmU2NzQ5MTI0MDJkYTYyNw",
    "expires_in": 3600,
    "token_type": "bearer",
    "scope": null,
    "refresh_token": "MWJhNTgxNxxxxxxxxZWI3MGQ2NmRlY2NhMTIzNTE5MDIxZA"
}
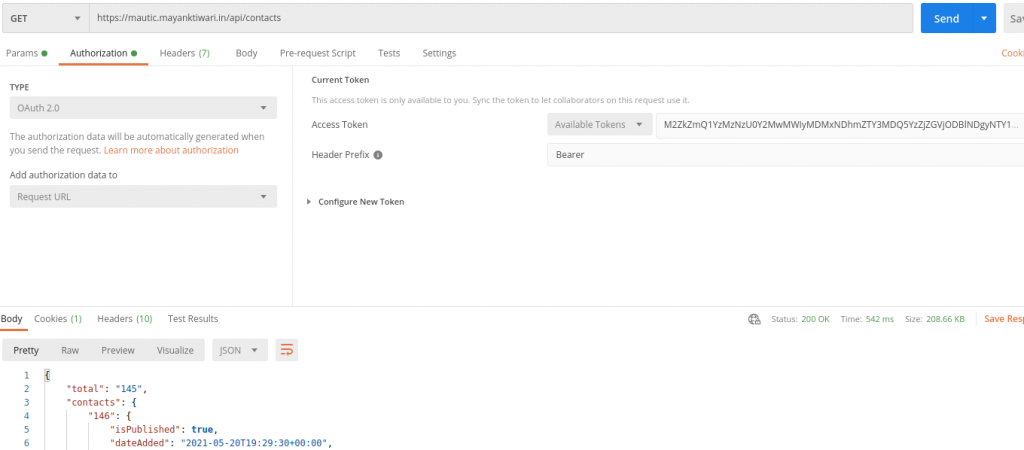
- This access token can be used in the Mautic API calling by adding an
Authorizationheader to the requests. - The token can be passed in header like
Authorization: Bearer access_token. - Or it can be put in the body or query parameter like
&access_token=xxxxxx.
Request examples in Mautic Rest API
Now that you are familiar with the Authentications and able to obtain access token, Let me show you some examples of the Mautic API. In the following section I’ll show you results using Contact API, some results are already shown in the previous sections in the form of example, in this section I’ll demonstrate 4 key type of requests using contact endpoint.
In the examples I’ll be using the same access_token generated in previous section.
GET Request to Mautic contact endpoint
The GET request is simplest of all. You make GET request all the time in browser by accessing any URL. even Contact endpoint can be called in browser as long as valid access_token is available. For example, to get contact details from Mautic about any known contact can be made by accessing following URL in the browser.
https://mautic.example.com/api/contacts/ID?access_token=xxxxxx
- Please replace mautic.example.com by your own Mautic URL.
- Add access token instead of
xxxxxx. - Replace the ID with the contact Id of the contact you want to access. contact ID or another object’s ID is available in the Object listing table in Mautic.
- The response from the API is a JSON object with details of the contact.
{
    "contact": {
        "isPublished": true,
        "dateAdded": "2021-05-18T18:12:46+00:00",
        "dateModified": null,
        "createdBy": 1,
        "createdByUser": "Name",
        "modifiedBy": 1,
        "modifiedByUser": "Name",
        "id": 3,
        "points": 0,
        "color": null,
        "fields": {
            "core": {
                "firstname": {
                    "id": "2",
                    "label": "First Name",
                    "alias": "firstname",
                    "type": "text",
                    "group": "core",
                    "object": "lead",
                    "is_fixed": "1",
                    "properties": "a:0:{}",
                    "default_value": null,
                    "value": "mifn1",
                    "normalizedValue": "mifn1"
                },
                "lastname": {
                    "id": "3",
                    "label": "Last Name",
                    "alias": "lastname",
                    "type": "text",
                    "group": "core",
                    "object": "lead",
                    "is_fixed": "1",
                    "properties": "a:0:{}",
                    "default_value": null,
                    "value": "miln1",
                    "normalizedValue": "miln1"
                },
                "company": {
                    "id": "4",
                    "label": "Primary company",
                    "alias": "company",
                    "type": "text",
                    "group": "core",
                    "object": "lead",
                    "is_fixed": "1",
                    "properties": "a:0:{}",
                    "default_value": null,
                    "value": "TestCompany1",
                    "normalizedValue": "TestCompany1"
                },
                "email": {
                    "id": "6",
                    "label": "Email",
                    "alias": "email",
                    "type": "email",
                    "group": "core",
                    "object": "lead",
                    "is_fixed": "1",
                    "properties": "a:0:{}",
                    "default_value": null,
                    "value": "name@example.com",
                    "normalizedValue": "name@example.com"
                },
                //and so on
            },
            "personal": [],
            "professional": [],
            "all": {
                "id": "3",
                "honey": null,
                "title": null,
                "firstname": "mifn1",
                "lastname": "miln1",
                "company": "TestCompany1",
                "position": null,
                "email": "name@example.com",
                "mobile": null,
                "phone": null,
                "points": 0,
                "fax": null,
                "address1": null,
                "address2": null,
                "city": null,
                "state": null,
                "zipcode": null,
                "country": null,
                "preferred_locale": null,
                "timezone": null,
                "last_active": null,
                "attribution_date": null,
                "attribution": null,
                "website": null,
                "facebook": null,
                "foursquare": null,
                "instagram": null,
                "linkedin": null,
                "skype": null,
                "twitter": null
            }
        },
        "lastActive": null,
        "owner": {
            "createdByUser": null,
            "modifiedByUser": null,
            "id": 1,
            "username": "mayank",
            "firstName": "Mayank",
            "lastName": "Tiwari"
        },
        "ipAddresses": [],
        "tags": [],
        "utmtags": [],
        "stage": null,
        "dateIdentified": "2021-05-18T18:12:46+00:00",
        "preferredProfileImage": "gravatar",
        "doNotContact": [],
        "frequencyRules": []
    }
}
This is how a complete Mautic contact object JSON looks like. In further examples I’ll not be using full response as that’ll take a lot of space on the page.
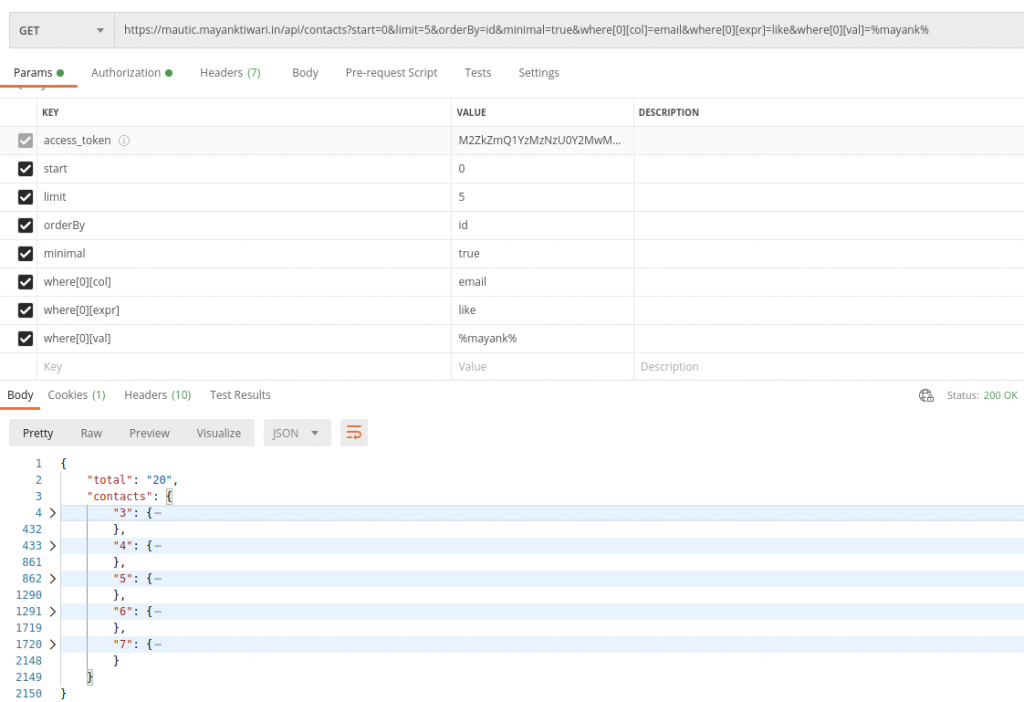
GET Request with paging to Mautic contact endpoint
When you try to get a list of objects, It can get messy and huge, thank fully Mautic API provide paging just like in UI. There are multiple options you can pass as parameter to limit the results and also to search and filter just like you do in UI. Let me give an example.
https://mautic.example.com/api/contacts?start=0&limit=5&orderBy=id&minimal=true&where[0][col]=email&where[0][expr]=like&where[0][val]=%mayank%
This URL will return a list of Objects from Mautic. The parameters are explained below.
- start – from which offset to start.
- limit – max number of objects to send.
- orderBy – the field name to order the result.
- minimal – this parameter tells Mautic to not send related entities.
- where – is a complicated and powerful parameter. It allows to make search over the columns, for example the query above is searching using
likeexpression inemailcolumn. If converted to SQL it’ll look something likewhere email like %mayank%. - It’ll only return the results where column ’email’ matches ‘mayank’.
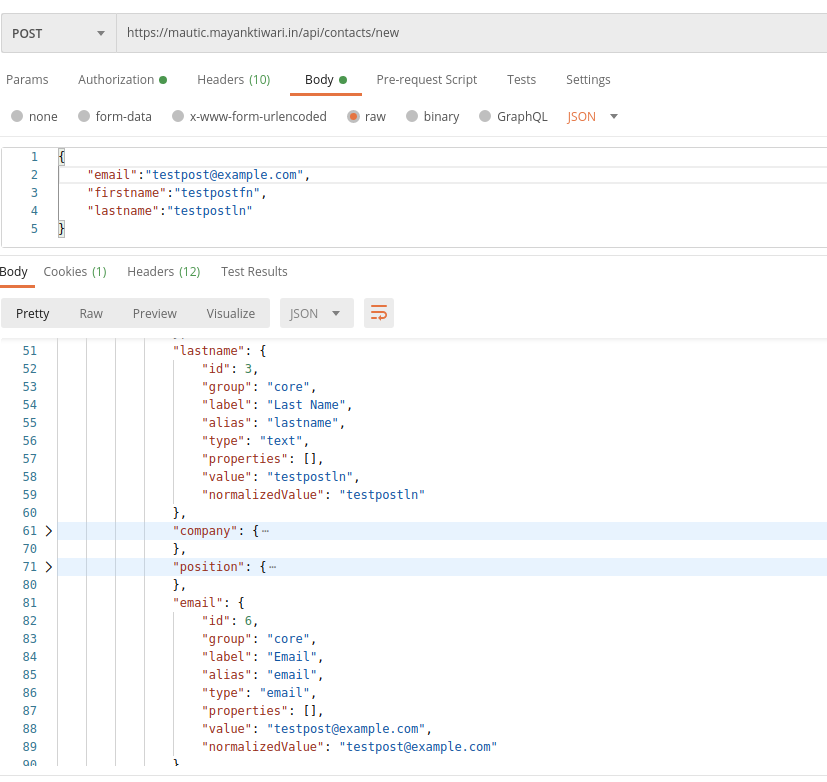
POST Request to Create Mautic contact
Creating contact or any other object in Mautic is as easy as getting an object. To create a new contact you need to make a POST request with JSON object. Let me show you with an example.
- The endpoint to use is
/api/contacts/new - The parameters can be passed in form of JSON like shown in example screenshot.
PUT Request to Update Mautic contact
To update the contact same data structure is used but the request changes to PUT and endpoint should contain the ID of the object.
- Endpoint for updating or editing contact is
/api/contacts/ID/edit. - Body in the form of JSON is accepted.
- In the example I am using same object which was created in previous request to change the lastname for demonstration.
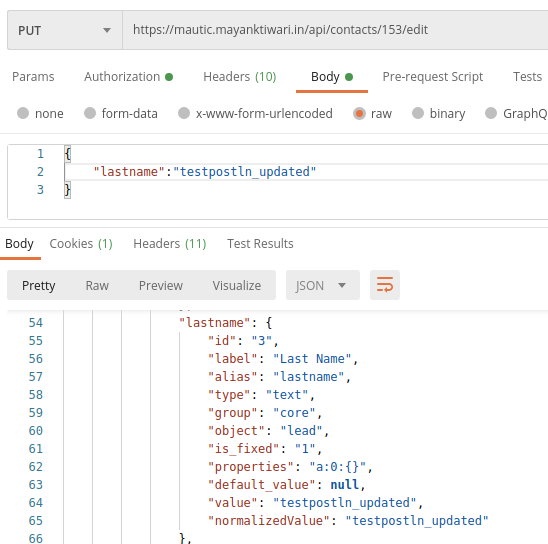
please note that currently there seems to be a bug which updates the field passed in json but erases other fields not passed in json. I have raised a forum entry for this issue. The workaround for this currently is to pass all the fields with values.
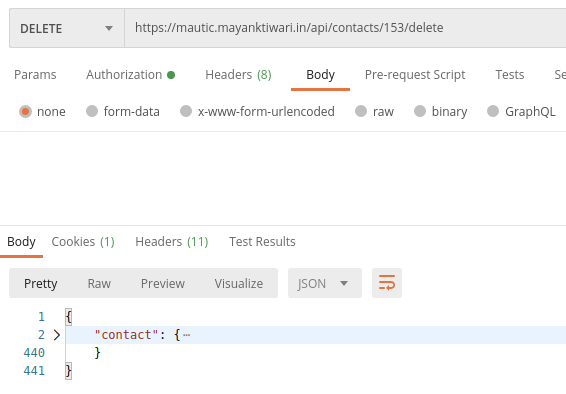
DELETE Request to remove Mautic contact
Delete is simple request and doesn’t require much effort, you just need to make a DELETE type request with ID of the object.
- The Endpoint for contact delete is
/api/contacts/ID/delete. - In the Request method use
DELETE. - It returns the response with contact body but Id is set to null and contact is removed from Mautic.
The Conclusion
Wow, that was a long one. I hope, I was able to demonstrate the API well. The examples in the authentication are standard for any platform like Mautic. OAuth1, Oauth2 and HTTP Basic described in this tutorial works similarly for any other platform which support these type of authentication.
Mautic API examples shown in the article applies to all other endpoints of Mautic as well. However there are few type of endpoints I have not explained but with examples in this tutorial because, i am sure it is sufficient to understand and use those endpoints and their working as well.
Pingback: androxal pay by cod
Pingback: discount enclomiphene american pharmacy
Pingback: order rifaximin uk meds
Pingback: buy xifaxan australia where to buy
Pingback: buy staxyn generic brand
Pingback: am a womani have emphysema low hemo etc dr wants to prescribe avodart
Pingback: acheter kamagra distribuer acheter
Pingback: buy flexeril cyclobenzaprine generic drug india
Pingback: discount gabapentin canada no prescription
Pingback: buying fildena buy germany
Pingback: comprar itraconazole en bilbao
Pingback: sleva kamagra na lince