In this tutorial i’ll show you how to prepare a server with docker environment so you could deploy any application there.
This tutorial will cover following key checkpoints:
- Install Docker on Ubuntu 24.04 LTS.
- Install Nginx.
- Install Certbot.
- Deploy a test app on docker with Dockerfile and Docker run command.
- Deploy a test app on docker with docker compose.
- Configure reverse proxy.
- Obtain let’s encrypt certificate with certbot.
- Access the App on browser with https using nginx reverse proxy.
Let’s get started First thing first, you need a linux server, with domain pointing to it. I had used an Amazon lightsail server instance with ubuntu 24.04 LTS. I configured my domain demodev.app by pointing A record to the ip address of the server. If you want to check a detailed tutorial about this you can read this article Lightsail domain management.
Once your domain and server is ready and you can access the terminal we can get started. First just run following commands to ensure server is up to date with repositories and packages update.
sudo apt get update
sudo apt get upgrade -y
Install Docker on Ubuntu 24.04 LTS
Installing docker is really easy the official docker documentation provides the commands which can be easily copy pasted.
It’s a two step approach, first set up repository and second install docker.
# Add Docker's official GPG key:
sudo apt-get update
sudo apt-get install ca-certificates curl
sudo install -m 0755 -d /etc/apt/keyrings
sudo curl -fsSL https://download.docker.com/linux/ubuntu/gpg -o /etc/apt/keyrings/docker.asc
sudo chmod a+r /etc/apt/keyrings/docker.asc

# Add the repository to Apt sources:
echo \
  "deb [arch=$(dpkg --print-architecture) signed-by=/etc/apt/keyrings/docker.asc] https://download.docker.com/linux/ubuntu \
  $(. /etc/os-release && echo "${UBUNTU_CODENAME:-$VERSION_CODENAME}") stable" | \
  sudo tee /etc/apt/sources.list.d/docker.list > /dev/null
sudo apt-get update
Once repository added, you can proceed to install docker.
sudo apt-get install docker-ce docker-ce-cli containerd.io docker-buildx-plugin docker-compose-plugin
This will take care of installing docker and docker compose both.
Once done you can simply type next command to test it.
sudo docker run hello-world
For now you need to use sudo but moving on to next step you will no longer need this. Just confirm that hello word was properly executed and then follow next steps to add the user to docker group, so that you no longer need to run docker as sudo everytime.
#create docker group, ideally it would exist already
sudo groupadd docker

#add user to the group
sudo usermod -aG docker $USER

#activate the changes
newgrp docker

#test again
docker run hello-world
That’s it you are done with docker now.
Let’s go to next step.
Install Nginx
Nginx will help us create create reverse proxy, this is required because everything you put on docker is available on a certain port which is mapped on local machine. We will need to route all requests coming from outside to the local port using a reverse proxy. something like this:
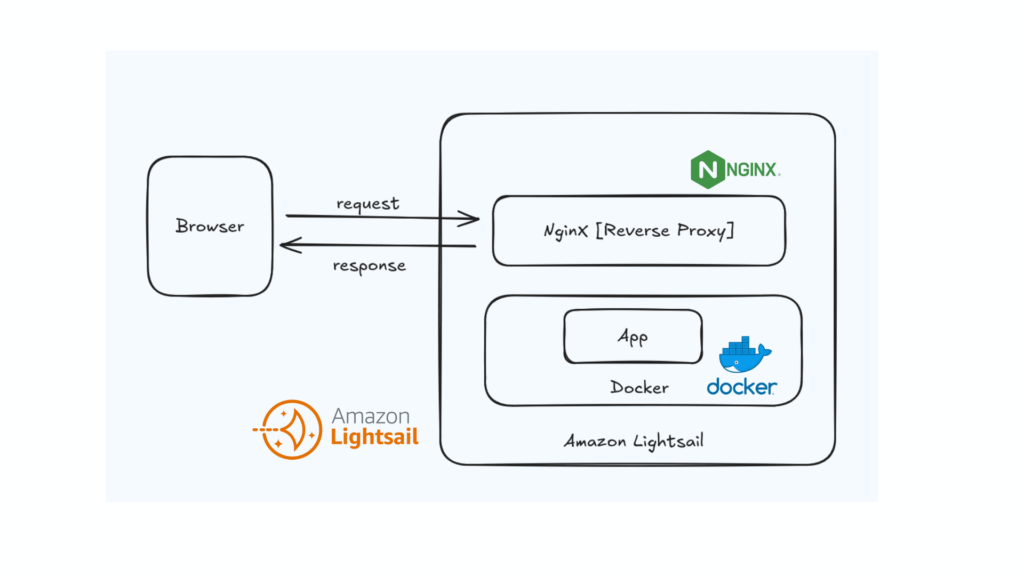
So let’s install and activate Nginx.
#install nginx and enable
sudo apt install nginx -y
sudo systemctl enable nginx
sudo systemctl start nginx
Install Certbot
sudo apt install certbot python3-certbot-nginx -y
yes, that’s is that’s how easy it is to install certbot. just one command, and you’ll see that just one command can fetch and configure the certificate for you, but for now let’s go to next step.
Deploy a test app on docker with Dockerfile and Docker run
We will be creating a very simple python app and run it on docker for testing. so let’s start by creating directory for the app.
mkdir ~/docker-dummy && cd ~/docker-dummy
nano app.py
Once the editor is open put the code in there, this is just a simple python code which lists the directories and files on the server.
from http.server import SimpleHTTPRequestHandler
from socketserver import TCPServer

PORT = 5000

with TCPServer(("", PORT), SimpleHTTPRequestHandler) as httpd:
    print("Serving at port", PORT)
    httpd.serve_forever()
Let’s create Dockerfile now.
nano Dockerfile
FROM python:3

WORKDIR /app
COPY app.py .

CMD ["python", "app.py"]
Build and run the app.
docker build -t dummy-app .
docker run -d --name dummy-app -p 5000:5000 dummy-app
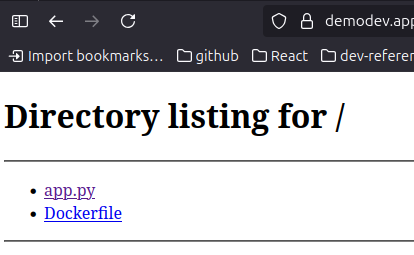
This code is telling docker to create a dockerised container by the name dummy-app and run the image dummy-app in it, and because we are running python on port 5000, we need to expose it to the docker host(ubuntu) on port 5000. To test it locally we can use curl command, you should see the output like this:
:~/docker-dummy$ curl localhost:5000
127.0.0.1 - - [11/Aug/2025 16:05:36] "GET / HTTP/1.1" 200 -
<!DOCTYPE HTML>
<html lang="en">
<head>
<meta charset="utf-8">
<title>Directory listing for /</title>
</head>
<body>
<h1>Directory listing for /</h1>
<hr>
<ul>
<li><a href="app.py">app.py</a></li>
<li><a href="Dockerfile">Dockerfile</a></li>
</ul>
<hr>
</body>
</html>
If you see the output that means you have successfully ran the app in docker. if you list your docker containers using docker ps you should see the running containers.
Deploy a test app on docker with docker compose
You would not want to run the docker command everytime and it’s kind of difficult to remember and pass all parameters on runtime, so to manage it better we have docker compose. Using this you can just create 1 docker compose file and use it to deploy the app easily.
Create the docker compose file:
docker stop dummy-app
docker rm dummy-app
nano docker-compose.yml
version: "3.8"
services:
  dummyapp:
    build: .
    container_name: dummy-compose
    ports:
      - "5000:5000"
    restart: always
Copy and Paste the above code in your docker-compose.yml file, this is telling docker to create a container named dummy-compose and run image dummyapp on it, and expose the port 5000. This is similar to what we did with docker run but a cleaner and better approach.
docker-compose up -d
Above command will build and deploy the app and you can test it again using curl localhost:5000
Configure reverse proxy
To configure the reverse proxy we have already installed nginx. now we need to create configuration files only. Let’s create them.
sudo nano /etc/nginx/sites-available/demodev.app
server {
    listen 80;
    server_name demodev.app;

    location / {
        proxy_pass http://localhost:5000;
        proxy_http_version 1.1;
        proxy_set_header Host $host;
        proxy_set_header X-Real-IP $remote_addr;
        proxy_set_header X-Forwarded-For $proxy_add_x_forwarded_for;
    }
}
Save, Create a link in sites-enabled directory as well. Then test and enable configuration.
sudo ln -s /etc/nginx/sites-available/demodev.app /etc/nginx/sites-enabled/
sudo nginx -t
sudo systemctl reload nginx
At this stage you should be able to acces the deployed app without any ssl certificate. the UI would look like this:
but currently it needs the Https, so let’s get it with certbot.
Obtain let’s encrypt certificate with certbot
We installed the certbot already in step 3, now let’s use it.
sudo certbot --nginx -d demodev.app
This will ask you few questions and then configure the certificate for you. After it’s done the final version of the config file will look like this:
server {
    server_name demodev.app;

    location / {
        proxy_pass http://localhost:5000;
        proxy_http_version 1.1;
        proxy_set_header Host $host;
        proxy_set_header X-Real-IP $remote_addr;
        proxy_set_header X-Forwarded-For $proxy_add_x_forwarded_for;
    }

    listen 443 ssl; # managed by Certbot
    ssl_certificate /etc/letsencrypt/live/demodev.app/fullchain.pem; # managed by Certbot
    ssl_certificate_key /etc/letsencrypt/live/demodev.app/privkey.pem; # managed by Certbot
    include /etc/letsencrypt/options-ssl-nginx.conf; # managed by Certbot
    ssl_dhparam /etc/letsencrypt/ssl-dhparams.pem; # managed by Certbot

}
server {
    if ($host = demodev.app) {
        return 301 https://$host$request_uri;
    } # managed by Certbot


    listen 80;
    server_name demodev.app;
    return 404; # managed by Certbot


}
Restart the nginx using command:
sudo systemctl restart nginx
Now after all this when you access the Website on actual url https://demodev.app you should be able to see the directory like it showed in previous step, but this time it’ll be secured by https.
You can watch the full tutorial on the youtube as well: