This tutorial demonstrate the use of AngularJS to create a CRUD based application with JAX-RS as backend. We are working with Three-tier web application and in the process using JPA, EJB with the RS and JSF at AngularJS front end. This is a step by step tutorial targeted for the intermediate level programmers.
Tools Used: Eclipse JavaEE – Juno, Wildfly 8.1.0
In this tutorial we are going to demonstrate the use of JAX-RS web service with the AngularJS in front end. This is another part of JavaEE web application series. We have seen many people struggling to work out the Angular with the JAX-RS, but it is unbelievably easy to do. In this tutorial we are going to do the same. We have already created the JPA Entities, EJB and Now we are going to create the Rest service using Resteasy from Jboss.
Series Index:
- MySql Datasource creation in Wildfly 8
- Project structure Eclipse+Wildfly+MySql+JPA+EJB+JSF+RS
- Creating Entity using JPA+Hibernate
- Creating EJB to do CRUD on Entity
- Creating View in JSF+Managed Bean
- Applying Bootstrap to JSF based Web Application
- Template based View in JSF Web Application
Let us tell you that, this is not for beginners, we expect you to at least know the basics of both the JAX-RS and AgnularJS. For an overview of what we are going to do at front end with AngularJS you can read our tutorial, “CRUD with AngularJS“.
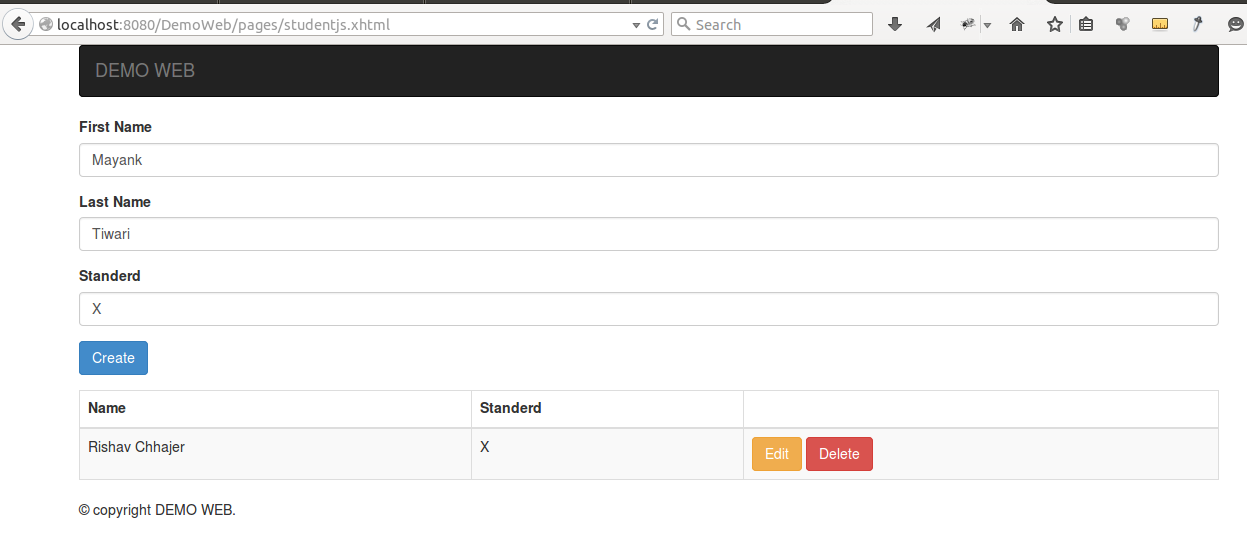
In our first step we are going to create an XHTML page which will work as the base of our front-end. We already have created a template based web application so Complete code may look little more than what you might have expected but The key is in the Form and Table. So Our request is to pay attention to that part only, but if you want to look at other parts too, you can of course follow the series index at the top of this tutorial and take a look around at various things.
Overview before we Proceed As we have already mentioned above that we are working with an already created series, here is what we are dealing with, We have created a JPA Entity called School with the fields, firstName, lastName and standard. Then we have created an EJB with the CRUD methods for the entity. Further more we created a JSF view backed by Managed Bean but as we are dealing with Angular The ManagedBean won’t be of much importance to us, However for information, we have created a template based structure. Now Please look at the XHTML page we have created to work out Angular.
<!DOCTYPE html PUBLIC "-//W3C//DTD XHTML 1.0 Transitional//EN" "http://www.w3.org/TR/xhtml1/DTD/xhtml1-transitional.dtd">
<ui:composition template="../templates/common-template.xhtml"
	 xmlns="http://www.w3.org/1999/xhtml"
      xmlns:h="http://java.sun.com/jsf/html"
      xmlns:f="http://java.sun.com/jsf/core"
      xmlns:ui="http://java.sun.com/jsf/facelets"
      xmlns:c="http://java.sun.com/jsp/jstl/core">
<ui:define name="title">Students</ui:define>
<ui:define name="content">
		<div class="row">
			<div class="col-xs-12" ng-app="studentApp" ng-controller="studentController">
					<form role="form" novalidate="" name="studentForm">
						<input type="hidden" name="id" ng-model="id"/>
						<div class="form-group">
							<label class="control-label">First Name</label>
							<input type="text" name="firstName" class="form-control" ng-model="student.firstName" required=""/>
						</div>
						<div class="form-group">
							<label class="control-label">Last Name</label>
							<input type="text" name="lastName" class="form-control" ng-model="student.lastName" required=""/>
						</div>
						<div class="form-group">
							<label class="control-label">Standerd</label>
							<input type="text" name="standerd" class="form-control" ng-model="student.standerd" required=""/>
						</div>
						<div class="form-group" ng-show="studentForm.$valid">
							<button class="btn btn-primary" ng-hide="student.id > 0 " ng-click="addStudent(student)">Create</button>
							<button class="btn btn-primary" ng-show="student.id > 0 " ng-click="updateStudent(student)">Update</button>
						</div>
					</form>
					<table class="table table-bordered table-striped">
						<thead>
							<tr>
								<th>Name</th>
								<th>Standerd</th>
								<th></th>
							</tr>
						</thead>
						<tbody>
							<tr ng-repeat="student in students">
								<td>{{student.firstName}} {{student.lastName}}</td>
								<td>{{student.standerd}}</td>
								<td>
									<a href="javascript:void(0);" class="btn btn-warning" ng-click="editStudent($index)">Edit</a>
									<a href="javascript:void(0);" class="btn btn-danger" ng-click="deleteStudent($index)">Delete</a>
								</td>
							</tr>
						</tbody>
					</table>
			</div>
		</div>
	</ui:define>
	<ui:define name="scripts">
		<h:outputScript library="js" name="angular.min.js"></h:outputScript>
		<h:outputScript library="js" name="students.js"></h:outputScript>
	</ui:define>
</ui:composition>
In the Code above we have created a Form which is used for the Create, Update operations and a Table which lists the values coming from database. We will use Rest service to get this data from database and using Angular to list it into the table. As you can see there we have marked the container div with ng-app and ng-controller directives, these are defined in the file called students.js which is included at the end of the page.
Key points in the code above to note are:
- We have marked the form with “novalidate” attribute because we are going to validate the form with Angular
- We have created ng-app with name studentApp and ng-controller by name studentController. Both are defined in the student.js file.
- Form elements are binded with ng-model with Object.
- We have used student Id to check if we are creating a new entry or editing an old one, and the submit button will only display(ng-show) when we are done filling up form.
- In the table we are using ng-repeat to create the table, along with edit and delete options which will make a function call to do the same.
Next we are going to define our Angular App and CRUD functions inside the Angular App.
(function(){

	var angularApp = angular.module("studentApp",[]);
	var serviceURI = "/DemoWeb/rest/";

	angularApp.controller("studentController",['$scope','$http',function($scope,$http){
		$scope.student = {};
		$scope.students = [];
		getAllStudents($scope,$http);

		$scope.addStudent = function(student){
			$http.post(serviceURI+"students",student).success(function(data){
				$scope.students.push(data);
			}).error(function(error){
				alert("Some Error Occurred!");
			});
		}

		$scope.updateStudent = function(student){
			$http.put(serviceURI+"students",student).success(function(data){
				if(data=="OK"){
					$scope.students[$scope.id] = student;
				}
			}).error(function(error){
				alert("Some Error Occurred!");
			});
		}

		$scope.deleteStudent = function(index){
			$http.delete(serviceURI+"students/"+$scope.students[index].id).success(function(data){
				if(data=="OK"){
					$scope.students.splice(index,1);
				}
			}).error(function(error){
				alert("Some Error Occurred!");
			});
		}

		$scope.editStudent = function(index){
			$scope.id = index;
			$scope.student = $scope.students[index];
		}

	}]);

	function getAllStudents($scope,$http){
		$http.get(serviceURI+"students").success(function(data){
			$scope.students = data;
		}).error(function(error){
			alert("Some Error Occurred!");
		});
	}

})();
In the Angular App we have created five functions for the CRUD operations, In each of the function we are doing only the call for the REST API which we are going to create next. We are making use of the $scope and $http property of Angular. Also notice the way we are working here, instead of refreshing whole table with all new JSON data we are only making updates in the object currently being edited or created. Thus saving time and bandwidth, which otherwise would have been wasted on all new requests.
Finally Here we are creating the Rest App on the Java side, We were doing all this in the Web part of our Application, now Rest work is being done in the EJB project of the Application. We are working in eclipse so we will be using its feature of creating the Rest framework for the CRUD operations.
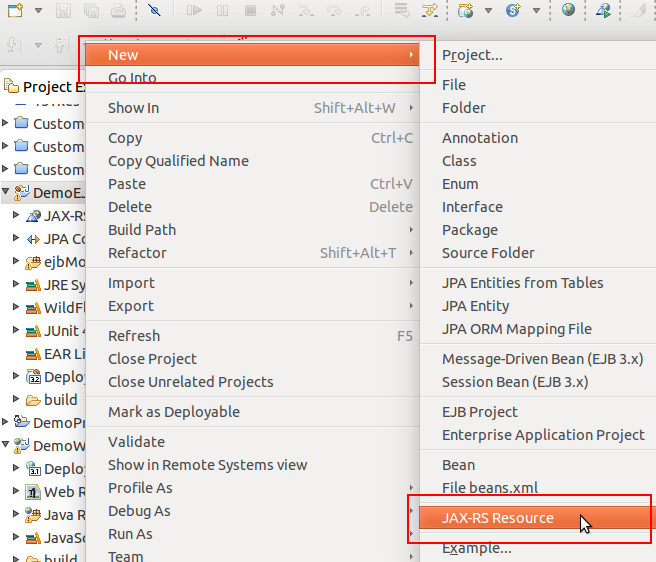
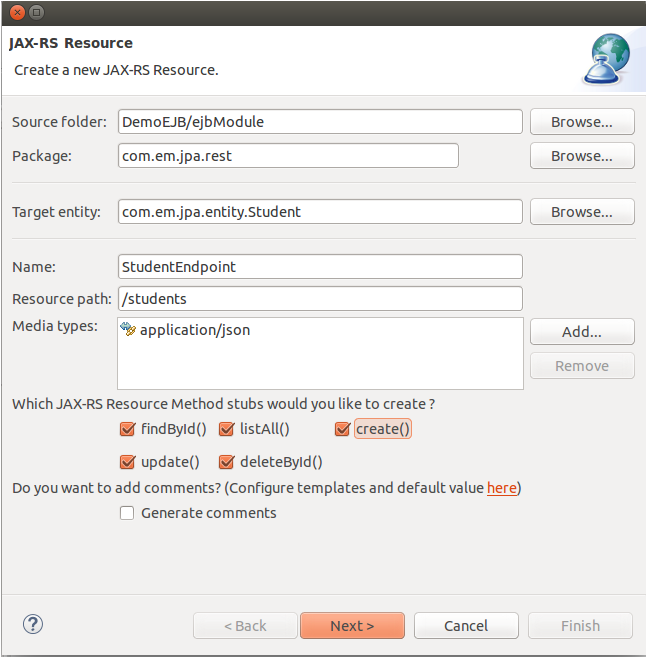
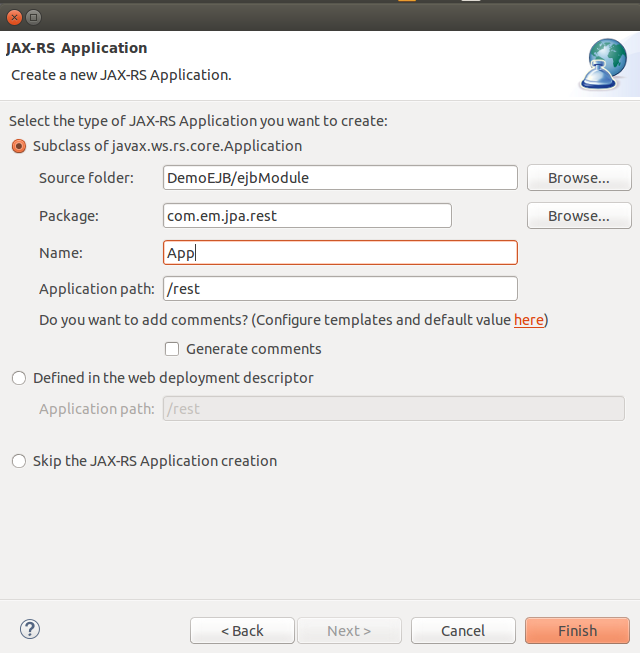
There first we create the Entity based Jax-RS, Now that the Default code framework has been provided we need to make changes in them to use the EJB and do actual operations. After making changes the code looks like this. Please note that there are two Java Files created one only extends the Application class, this exposes our Rest service to a particular API and second one is actual service.
package com.em.jpa.rest;

import javax.ws.rs.ApplicationPath;
import javax.ws.rs.core.Application;

@ApplicationPath("/rest")
public class App extends Application {

}
package com.em.jpa.rest;

import java.util.List;

import javax.ejb.EJB;
import javax.enterprise.context.RequestScoped;
import javax.ws.rs.Consumes;
import javax.ws.rs.DELETE;
import javax.ws.rs.GET;
import javax.ws.rs.POST;
import javax.ws.rs.PUT;
import javax.ws.rs.Path;
import javax.ws.rs.PathParam;
import javax.ws.rs.Produces;
import javax.ws.rs.QueryParam;
import javax.ws.rs.core.Response;
import javax.ws.rs.core.Response.Status;

import com.em.ejb.beans.interfaces.StudentDAORemote;
import com.em.jpa.entity.Student;

@RequestScoped
@Path("/students")
public class StudentEndpoint {
	@EJB
	StudentDAORemote studentRemote;

	@POST
	@Consumes("application/json")
	public Student create(Student student) {
		return studentRemote.create(student);
	}

	@GET
	@Path("/{id:[0-9][0-9]*}")
	@Produces("application/json")
	public Response findById(@PathParam("id") int id) {
		Student student = studentRemote.getStudent(id);
		if (student == null) {
			return Response.status(Status.NOT_FOUND).build();
		}
		return Response.ok(student).build();
	}

	@GET
	@Produces("application/json")
	public List listAll(
			@QueryParam("start") final Integer startPosition,
			@QueryParam("max") final Integer maxResult) {
		List students = studentRemote.getAllStudents();
		return students;
	}

	@PUT
	@Consumes("application/json")
	@Produces("text/plain")
	public Response update(Student student){
		Response r = null;
		try{
			studentRemote.update(student);
			r = Response.ok("OK").build();
		}
		catch(Exception e){
			System.out.println("exception in create "+e);
			r = Response.ok("error").build();
		}
		return r;
	}

	@DELETE
	@Path("/{id:[0-9][0-9]*}")
	@Produces("text/plain")
	public Response deleteById(@PathParam("id") int id) {
		Response r = null;
		try{
			studentRemote.remove(id);
			r = Response.ok("OK").build();
		}
		catch(Exception e){
			System.out.println("exception in create "+e);
			r = Response.ok("error").build();
		}
		return r;
	}
}
In the first one we define the @ApplicationPath and in second one we define the @Path for the access of API. Now you can run your application to see if its working fine.
Please Note that Here the whole application is depending on some of the other articles in this series, we suggest you to proceed in appropriate way that goes well with your application.
Pingback: generique kamagra pharmacie envoyer ai
Pingback: get enclomiphene generic pharmacy online
Pingback: order androxal without recipe
Pingback: buying flexeril cyclobenzaprine cheap canadian pharmacy
Pingback: dutasteride online no perscription fedex
Pingback: cheapest buy gabapentin price in canada
Pingback: online order fildena generic order
Pingback: order staxyn price usa
Pingback: how to buy itraconazole usa online pharmacy
Pingback: avodart online next day
Pingback: discount rifaximin uk london
Pingback: cheapest buy xifaxan generic from canadian pharmacy
Pingback: online lékárna kamagra